# Welcome to the bitoftrade docs!

This is where you can find all the information you need to get started with our platform and take full advantage of its features and tools.&#x20;

Whether you are a new user or an experienced pro, our docs have been designed to provide you with the knowledge and resources you need to succeed.&#x20;

You'll find everything you need right here if you're looking for step-by-step guides, technical details, or answers to frequently asked questions. So, let's get started and explore what our platform has to offer!


# bitoftrade intro

bitoftrade strives to push the boundaries and create a universal platform that users from a wide variety of digital spheres can freely use for their needs.

bitoftrade is all-in-one platform that provides a web and mobile-friendly interface where the best protocols are integrated into a simple, easy to use trading platform.

**bitoftrade products:**

* **Decentralized trading platform**

bitoftrade is a decentralized trading platform with advanced trading features that you normally find on both centralized and decentralized exchanges, all rolled into one platform! You get the advantages of a friendly user interface with multiple trading types, what more could you want from a trading platform?

Trading tools available on bitoftrade:

​[Swaps](https://bitoftrade.com/trading/swap/0xa0b86991c6218b36c1d19d4a2e9eb0ce3606eb48/0xeeeeeeeeeeeeeeeeeeeeeeeeeeeeeeeeeeeeeeee) with high DeFi liquidity are currently available across 5 networks, as are traditional limit orders​

[Leverage](https://bitoftrade.com/trading/leverage/ETH/USDC) trades with the market exposure up to 20xBuy & sell crypto for [fiat](https://bitoftrade.com/fiat-exchange) (requires KYC per AML regulations)

​[Market](https://bitoftrade.com/markets) screener

* **Cross-chain Messaging Protocol (CCMP)**

CCMP is completely free and a 100% open-source service for developers to build secure services and dApps that can send messages across multiple chains.

CCMP is a quick and easy way to trust events from any chain. It relies on the proof of the event that can be verified and used on any chain.

* **AllPay Widget**

AllPay Widget is a customizable web object that can be embedded into any webpage, enabling users to link their wallets, make cryptocurrency payments, trade fungible tokens, and purchase NFT all without ever leaving the hosting website.

​*Find more specific info about our tools here:*

*​*[*Decentralized trading platform​*](/for-traders/trading-platform)

[*Cross-chain Messaging Protocol*](/for-developers/cross-chain-messaging-protocol)

*​*[*AllPay Widget*](/for-businesses/allpay-widget)<br>


# Contact Us

### Follow us on our official social media channels!

We have a thriving community spread across various channels. Stay up to date with the latest announcements, and join our discussions! &#x20;

Joining our community is a great way to stay up-to-date with platform updates, connect with other users, and get support from our team. It is a convenient and efficient way to get help with any issues you may have.

* [Discord](https://discord.gg/wfReEmmzrd)
* [Telegram Chat](https://t.me/bitoftrade_official)

You can also reach our customer service team directly from the platform by clicking [here](https://bitoftrade.com/#support).

Stay tuned to all bitoftrade and crypto news at our official [Twitter](https://twitter.com/bitoftrade) and [LinkedIn](https://www.linkedin.com/company/bitoftrade/)!

If you're looking for a helpful and engaging way to learn about the platform, be sure to check out the tutorials on our [YouTube](https://www.youtube.com/@bitoftrade) channel and visit our [Blog](https://bitoftrade.com/blog), where you can find a lot of useful crypto articles!

Additionally, you can request a feature for the bitoftrade platform by clicking [here](https://bitoftrade.canny.io/request-features).


# Cross-Chain Swaps

bitoftrade's Web3 Cross-Chain Solution: Unlocking Boundless Possibilities

bitoftrade revolutionizes the Web3 ecosystem with its cutting-edge cross-chain solution. Connecting diverse blockchain networks like Ethereum, Binance Smart Chain, and more, our solution empowers secure and efficient value transfer.&#x20;

Our cross-chain solution utilizes DEX for seamless swaps between blockchains, allowing efficient 2 USDC-pegged swaps and transfers. Third-party market makers enhance the process, ensuring an optimal user experience. Simplifying complex cross-chain operations is our goal!

Join us in unlocking boundless possibilities in the interconnected world of blockchain technology. bitoftrade – Connecting Chains, Unleashing Potential.

*Please be aware that this version is currently in beta, supporting limited chains and liquidity. We are actively working to improve and expand its capabilities. Thank you for your understanding as we continue to enhance our offering.*


# How it works

Our cross-chain protocol empowers users to swap tokens seamlessly across multiple networks, offering the lowest fees in the market. With an intuitive user interface and complete transparency, users can enjoy a hassle-free experience. Leveraging DEX liquidity on various networks, our protocol ensures the best cross-chain swap rates available.

<figure><img src="https://707480146-files.gitbook.io/~/files/v0/b/gitbook-x-prod.appspot.com/o/spaces%2FxegFG0slk40bOOCouVQE%2Fuploads%2FEIOQDkjFZ0aEva3KRD3R%2Fimage.png?alt=media&amp;token=6b491d43-db4e-47c6-a980-0b247e82f814" alt=""><figcaption></figcaption></figure>


# Liquidity providers & validators

Cross-Chain swaps are facilitated through a two-step process known as "swap & transfer" transactions on selected networks.&#x20;

Our model relies on the availability of USDC liquidity within protocol pools across supported networks. Liquidity provision and management, including USDC pool rebalancing, are handled by the community, with rewards provided to all liquidity providers.

To ensure sustainable liquidity, the protocol charges a 0.1% fee for liquidity provision from each transaction. These fees are subsequently distributed among the relevant liquidity pools, promoting a fair and incentivized ecosystem for liquidity providers.

By employing the "swap & transfer" approach and engaging the community's support, bitoftrade enables seamless cross-chain swaps while fostering liquidity growth and rewarding participants.


# Security

At bitoftrade, we prioritize the utmost security for our cross-chain swap protocol. To ensure the safety of funds locked in the protocol pools, we employ a highly advanced and efficient cryptographic technique known as 'Threshold Signatures'. This approach allows for a reasonable number of validators, striking a balance between security and transaction costs for the end user.

By utilizing Threshold Signatures, we can maintain the integrity and confidentiality of transactions while reducing the burden of high transaction fees. This cryptographic technique enables the protocol to guarantee the security of funds locked within the protocol pools, providing users with peace of mind during cross-chain swaps.

<figure><img src="https://707480146-files.gitbook.io/~/files/v0/b/gitbook-x-prod.appspot.com/o/spaces%2FxegFG0slk40bOOCouVQE%2Fuploads%2Fiva0LS660tUfrJyKhq4S%2Fimage.png?alt=media&amp;token=5a47138e-0f5e-46a6-a610-5eb2a7b33e98" alt=""><figcaption></figcaption></figure>

In addition to the implementation of advanced cryptographic measures, we have also subjected our smart contracts to rigorous security audits. These audits have been conducted by a third-party security firm to identify and address any potential vulnerabilities. Our commitment to security means that we have taken proactive steps to fortify our smart contracts and ensure the overall robustness of our cross-chain swap protocol.

By combining the employment of Threshold Signatures with comprehensive security audits, we aim to provide users with a secure and reliable platform for conducting cross-chain swaps. Rest assured, we remain dedicated to upholding the highest security standards to protect your assets and enable smooth and worry-free transactions.

Please note that while we take extensive measures to ensure security, it is always advisable to exercise caution and conduct due diligence when engaging in any financial transactions.


# User Guide

Swap tokens between multiple networks

To get started with our cross-chain protocol, follow these simple steps:

Connect Your Wallet: Connect your preferred wallet that supports the desired networks participating in the cross-chain swap.

<figure><img src="https://707480146-files.gitbook.io/~/files/v0/b/gitbook-x-prod.appspot.com/o/spaces%2FxegFG0slk40bOOCouVQE%2Fuploads%2Fzpd7R4eRJ4Z7h6hMIXYG%2Fimage.png?alt=media&amp;token=5cc89e41-7e1d-438c-a5cd-d95874f6a860" alt=""><figcaption></figcaption></figure>

Choose Networks: Select the networks involved in the cross-chain swap. Our protocol supports a wide range of networks, ensuring compatibility with your preferred choices.

<figure><img src="https://707480146-files.gitbook.io/~/files/v0/b/gitbook-x-prod.appspot.com/o/spaces%2FxegFG0slk40bOOCouVQE%2Fuploads%2F9TCEUpNVWiPNLCAXME8O%2Fimage.png?alt=media&amp;token=ad7485ba-92b3-4f90-a8a6-822b6ba4ea53" alt=""><figcaption></figcaption></figure>

Select Tokens: Choose the tokens you wish to swap. Our protocol allows you to swap any token to any other token, providing flexibility and limitless possibilities.

<figure><img src="https://707480146-files.gitbook.io/~/files/v0/b/gitbook-x-prod.appspot.com/o/spaces%2FxegFG0slk40bOOCouVQE%2Fuploads%2FmalHkvodqeF5btx9roU6%2Fimage.png?alt=media&amp;token=828b99be-d75b-4b43-a3b1-19a2cd47f425" alt=""><figcaption></figcaption></figure>

Unlock token: it is important to understand the stage of unlocking tokens when utilizing the Cross-Chain Protocol. After executing the cross-chain swap, the protocol will facilitate the unlocking of the tokens on the destination network. This stage ensures that the swapped tokens become accessible and usable within the intended network.

<figure><img src="https://707480146-files.gitbook.io/~/files/v0/b/gitbook-x-prod.appspot.com/o/spaces%2FxegFG0slk40bOOCouVQE%2Fuploads%2FfeDB6DCO5XTTtaQ7x4LJ%2Fimage.png?alt=media&amp;token=64738788-4ecc-479b-a903-9fd688d23e8b" alt=""><figcaption></figcaption></figure>

Review Fees: Our protocol is designed to offer the lowest fees on the market. Before proceeding with the swap, review the fees associated with the transaction to ensure transparency and make informed decisions.

<figure><img src="https://707480146-files.gitbook.io/~/files/v0/b/gitbook-x-prod.appspot.com/o/spaces%2FxegFG0slk40bOOCouVQE%2Fuploads%2FM2WRgjrsF2QKcccsW8Z7%2Fimage.png?alt=media&amp;token=0aa2671b-d3a8-4fc1-9078-c6ebb6088d12" alt=""><figcaption></figcaption></figure>

Confirm and Execute: Once you have reviewed the details, confirm the transaction, and execute the cross-chain swap. You will be able to see the status in the 'Transaction table'.

<figure><img src="https://707480146-files.gitbook.io/~/files/v0/b/gitbook-x-prod.appspot.com/o/spaces%2FxegFG0slk40bOOCouVQE%2Fuploads%2FE4Z3VWSm7U11zR8tJpIH%2Fimage.png?alt=media&amp;token=d7967d5a-cf30-42be-8ee7-46dff8d362ad" alt=""><figcaption></figcaption></figure>

Please note that while we aim to provide the best user experience, cross-chain swaps involve multiple networks and may take some time to complete. Factors such as network congestion and transaction confirmations can impact the speed of the swap. Rest assured, we prioritize efficiency and continually work to optimize the swap process.

For any additional information or assistance, please refer to our comprehensive user documentation or reach out to our support team. We are here to guide you throughout your cross-chain journey.

We are excited to help you swap tokens seamlessly across multiple networks with the lowest fees, an intuitive UI, and complete transparency.


# Trading platform

An introduction to the bitoftrade trading platform and all it has to offer.

### An introduction to the bitoftrade platform.

bitoftrade is a decentralized trading platform with advanced trading features that you normally find on both centralized and decentralized exchanges, all rolled into one platform! You get the advantages of a friendly user interface with multiple trading types, what more could you want from a trading platform?

bitoftrade is a much improved Binance-like trading platform with multiple advanced trading features with significant advantages compared to centralized exchanges (CEXs). We retain many of the key strengths of CEXs—such as a user friendly interface, several trading tools, and a highly responsive customer support team—and solve several of their weaknesses by providing fully decentralized solutions on multiple blockchains including no KYC, non-custodial, and anonymity to traders. Essentially, you get the best benefits of both worlds, i.e. the best CEX and DEX features combined with our trading platform, providing you with the ultimate trading experience.

Our platform allows users to expand their crypto portfolio with leverage trading, limit orders, and swaps between tokens directly from their wallets. There is no registration or KYC verification process, we support trades on multiple networks, and you can trade using optimized market prices at highly competitive fees.

&#x20;

The networks available on our platform are currently Ethereum, Polygon, BSC, Avalanche, and Fantom, and there we support nearly all the tokens available to trade across these networks.


# Features

An overview of bitoftrade’s easy-to-use trading features

Our platform allows users to expand their crypto portfolio with [leverage trading](/for-traders/trading-platform/features/leverage-trading),  [swaps](/for-traders/trading-platform/features/token-swaps) between tokens directly from their wallets. [Crypto gateway](/for-traders/trading-platform/features/buy-crypto-with-fiat) also available on the platform, making it super simple for you to trade in your favorite digital assets. We support trades on multiple networks, and you can trade using optimized market prices at highly competitive fees.&#x20;


# Leverage trading

### Leverage trading <a href="#leverage-trading" id="leverage-trading"></a>

A leverage trade allows you to pay less than the full amount of your investment, which increases your buying capacity to explore and take advantage of market opportunities. The amount of money you can use for buying and selling tokens is relative to your initial investment and determined by your chosen leverage amount. You can leverage market orders, limit trades, and stop orders on our platform. All you need to do is deposit collateral to use this feature.

More about our leverage trade types:

**Market orders.** A market order is an order to buy or sell a stock at the market's current best available price. It typically ensures execution, but it doesn’t guarantee a specified price. Market orders are ideal if you want to execute a trade immediately.

<figure><img src="https://707480146-files.gitbook.io/~/files/v0/b/gitbook-x-prod.appspot.com/o/spaces%2FxegFG0slk40bOOCouVQE%2Fuploads%2FUO18cpaCf9k61TrU5Rle%2Fleverage.gif?alt=media&amp;token=9c404b6d-e94a-46a7-9244-78878854cd41" alt=""><figcaption></figcaption></figure>

**Limit Trading.** With a limit order, you can buy or sell tokens at a specified price. A buy order will be executed at your specified price, and likewise, a sell order will be executed at your specified price.

**For example:** Let's say you want to buy ETH, which is now $4,000, but you think that the price will drop and you may be able to buy ETH at a cheaper price. You place a limit order on bitoftrade to buy ETH for $3,000, and when the value of ETH falls to your desired price, your trading limit order will be executed.

<figure><img src="https://707480146-files.gitbook.io/~/files/v0/b/gitbook-x-prod.appspot.com/o/spaces%2FxegFG0slk40bOOCouVQE%2Fuploads%2FhTWe8RcqSEgRVfaSyNTB%2Fleverage%20limit.gif?alt=media&amp;token=ecac67b8-a942-4921-ba45-bd22e9a0de9c" alt=""><figcaption></figcaption></figure>

**Stop-loss orders.** A stop-loss is an order placed on an exchange to buy or sell a specific token once its market value reaches a certain price. The whole idea around stop loss is to limit your losses when trading and reduce the risk to your portfolio. If the market reaches your specified value, a stop-loss can be triggered and your funds can be traded out of their current position.

<figure><img src="https://707480146-files.gitbook.io/~/files/v0/b/gitbook-x-prod.appspot.com/o/spaces%2FxegFG0slk40bOOCouVQE%2Fuploads%2F7matWSGkoyjrnTfxZSpM%2Fleverage%20stop.gif?alt=media&amp;token=7b4fd8c0-efc6-4103-bb6e-20d14816edb2" alt=""><figcaption></figcaption></figure>


# Token swaps

You can swap almost all tokens on our platform over five different networks: Ethereum, Fantom, Avalanche, BSC, and Polygon. You can execute both market and limit swaps with bitoftrade.

**Market Swaps.** A market swap is an exchange process that allows you to trade one asset for another at the current best available price among more than 40 decentralized exhchanges. You can trade and exchange most tokens on the five networks available on our platform: Ethereum, Polygon, Avalanche, Fantom, and BSC.

<figure><img src="https://707480146-files.gitbook.io/~/files/v0/b/gitbook-x-prod.appspot.com/o/spaces%2FxegFG0slk40bOOCouVQE%2Fuploads%2FAjtTcVQE235c4HzeKyEx%2Fswap.gif?alt=media&amp;token=71a5fdc6-0ad0-4dc4-b68f-071e09f35c2b" alt=""><figcaption></figcaption></figure>

**Limit Swaps.** Limit trading can be applied to swaps as well as to leverage trades on the Ethereum blockchain.


# Buy crypto with fiat

Our fiat-to-crypto widget is a strong bridge between Fiat and cryptocurrencies. At bitoftrade, you can make payments with your preferred method. We offer Instant SEPA bank transfers, as well as SWIFT or Visa/MasterCard payments.

You can learn how to use these trading types on the bitoftrade platform in our guides section containing detailed information about each type of trade.

We’re constantly improving our platform to improve our trading experience for both new and advanced traders alike. You can be involved in helping us upgrade our platform by proposing new features [here](http://bitoftrade.canny.io/request-features).


# Market screener

Real-time cryptocurrency price tracking, market capitalization, and trading volume information for a wide range of digital assets. Additionally, you'll be able to find the token address and know on which networks each cryptocurrency is available for trading on the platform.&#x20;

<figure><img src="https://707480146-files.gitbook.io/~/files/v0/b/gitbook-x-prod.appspot.com/o/spaces%2FxegFG0slk40bOOCouVQE%2Fuploads%2FM1HO3NodbrNMFUxsQDg6%2FMarkets.gif?alt=media&amp;token=9f6fd343-cdb0-40de-b1a9-9fdfe3f4fdf4" alt=""><figcaption></figcaption></figure>


# Quick start

How to start trading on the platform

Getting ready to make your first trade with us is simple! All you need to do is connect your wallet and have some tokens ready to make your first trade (for example, some ETH tokens). Remember that for trades on the Ethereum network you’ll need some ETH in your wallet to pay for gas fees too.

&#x20;

So, in short, what do you need?

* A crypto wallet: MetaMask or Trust Wallet. More wallet options will be added to our platform soon.
* You need ETH in your wallet before any executing trades. If you don’t have any ETH, don’t worry you can use our new fiat widget [here](https://bitoftrade.com/fiat-exchange).
* Enthusiasm for trading! You’re all set to start trading with bitoftrade.

&#x20;

Read all about how to connect MetaMask with our complete guide [here](https://bitoftrade.com/blog/metamask-review-a-complete-guide-of-the-best-ethereum-wallet-by-bitoftrade).&#x20;

To connect to Trust Wallet, please click [here](https://www.youtube.com/watch?v=aj0CKrKlric).


# How do I swap tokens on bitoftrade?

#### Learn more about swapping tokens with bitoftrade.&#x20;

Are you interested in diversifying your crypto portfolio? We’ve got you covered.

Swapping tokens is the easiest type of trading you can do! You simply swap one token for another without needing to do any crypto-to-fiat exchange or token migration. Token swap is the best way to diversify your portfolio and expand the tokens you’re using.&#x20;

At bitoftrade, we offer advanced trading tools such as swap trading. You can start swapping most tokens on the bitoftrade platform across integrated networks such as Ethereum, Avalanche, Polygon, BSC, and Fantom.&#x20;

Start swapping tokens with our eight handy steps:

* Go to the trading dashboard on our [website](https://bitoftrade.com/) by clicking on “Start Trading”.
* Connect your wallet and choose “Swap” on the trading dashboard.

![Screen\_Shot\_2022-06-13\_at\_17.08.01.png](https://bitoftrade.zendesk.com/hc/article_attachments/6844738376337/Screen_Shot_2022-06-13_at_17.08.01.png)

* Set your trading pair by searching for a specific token by name and choosing how many tokens you want to trade.

![Screen\_Shot\_2022-06-13\_at\_17.11.56.png](https://bitoftrade.zendesk.com/hc/article_attachments/6844738231057/Screen_Shot_2022-06-13_at_17.11.56.png)

* Click ‘Confirm’ and you’ll see your transaction summary, including all estimated fees.
* Accept the terms and your MetaMask or Trust Wallet will open automatically.

![Screen\_Shot\_2022-06-13\_at\_17.12.30.png](https://bitoftrade.zendesk.com/hc/article_attachments/6844738381585/Screen_Shot_2022-06-13_at_17.12.30.png)

* After approving the transaction on your wallet, a progress bar will appear on the widget and it’ll disappear after approval.
* When the transaction is finished, you can see its status in the “Transaction History” section at the bottom of the page, as well as the new tokens in your wallet.

![Screen\_Shot\_2022-06-13\_at\_17.13.23.png](https://bitoftrade.zendesk.com/hc/article_attachments/6844738610577/Screen_Shot_2022-06-13_at_17.13.23.png)

Once finished, go to your chosen network’s blockchain explorer and see your transaction details:

* [Ethereum](https://etherscan.io/)
* [Polygon](https://polygonscan.com/)
* [Fantom](https://ftmscan.com/)
* [BSC](https://bscscan.com/)
* [Avalanche](https://snowtrace.io/)

You can also watch our short video to learn how you can swap tokens on bitoftrade:

{% embed url="<https://www.youtube.com/watch?v=Vwdua-eAhVo>" %}

\
Visit our [website](https://bitoftrade.com/) and start trading with us! You can learn more swapping tips in our article [Token Swap: Five Top Tips You Should Know](https://bitoftrade.com/blog/token-swap-five-top-tips-you-should-know) over on our blog.


# How to buy crypto with fiat?

#### A simple guide to buying cryptocurrency.

You can easily buy crypto with fiat money, for example, using USD to purchase Bitcoin. The majority of major global paper currencies are all classed as fiat, so you can get trading straight away!

Let’s get started.

* Visit [bitoftrade.com](http://bitoftrade.com/) and select “Start Trading”.
* From the top-left options, (“Swap”, “Leverage”, “Fiat”) click “Fiat”.

![Screen\_Shot\_2022-06-13\_at\_17.18.37.png](https://bitoftrade.zendesk.com/hc/article_attachments/6844413940753/Screen_Shot_2022-06-13_at_17.18.37.png)

* Select the amount and type of currency you’d like to exchange. *You can also sell currency, by selecting the “Sell” option demonstrated below.*&#x20;
* The exchange rate will be automatically generated. Please select the type of currency you’d like to receive from the “You Get” options.
* Click “Buy”.

![Screen\_Shot\_2022-06-13\_at\_17.20.15.png](https://bitoftrade.zendesk.com/hc/article_attachments/6844365676817/Screen_Shot_2022-06-13_at_17.20.15.png)

* Select your preferred payment option. Don’t forget to read and confirm acceptance of Guardarian’s “terms of service”, “privacy policy”, and our “personal data processing” information.

![Screen\_Shot\_2022-06-13\_at\_17.20.36.png](https://bitoftrade.zendesk.com/hc/article_attachments/6844365786129/Screen_Shot_2022-06-13_at_17.20.36.png)

* Add the address of the crypto-receiving wallet.

![Screen\_Shot\_2022-06-13\_at\_17.21.10.png](https://bitoftrade.zendesk.com/hc/article_attachments/6844365785361/Screen_Shot_2022-06-13_at_17.21.10.png)

&#x20;

* Provide your country, mobile number, and/or email address, and select “Send Code”.
* Enter your received code when prompted to do so.

![Screen\_Shot\_2022-06-13\_at\_17.26.45.png](https://bitoftrade.zendesk.com/hc/article_attachments/6844414263441/Screen_Shot_2022-06-13_at_17.26.45.png)

* Complete the identity verification process\* and payment.

![Screen\_Shot\_2022-06-13\_at\_17.22.40.png](https://bitoftrade.zendesk.com/hc/article_attachments/6844416298385/Screen_Shot_2022-06-13_at_17.22.40.png)

&#x20;

* Sit back and wait for the exchange to be made!

*\*Please note that identity verification is an ordinary procedure for fiat-to-crypto transfers. This is the only time you’ll ever need to complete KYC verification, as it doesn’t apply to standard crypto-to-crypto exchanges.*


# How to trade with leverage on bitoftrade?

#### Learn more about leverage trading with bitoftrade

So, you’re looking to start earning with crypto trading? Leverage is a great trade type for this!&#x20;

Leverage trading increases your buying capacity and exposure to market opportunities by enabling you to pay less than the full price of your investment. What’s more, we offer specific features as part of our leveraging process! The amount of money you can borrow is relative to your initial investment and determined by your chosen leverage.

Let's say you have $100 to buy some ETH. If ETH rises by 10%, you’ll receive an additional $10. However, if you use 10x leverage on your initial investment, you’ll have 10x more funds in your position. This means that your returns will increase tenfold as well. Plus, if ETH rises by 10% soon, you’ll receive an additional $100.

However, please take into account that if the value of ETH drops by 10%, you’ll lose $100. Since your initial investment was $100, a margin call will be initiated, and your position will be liquidated.

At bitoftrade, we offer advanced trading tools such as leverage trading. You can increase potential profits by applying an x20 to your crypto holdings!

You can learn how to leverage trade with bitoftrade by following our simple steps:

1. Go to our trading dashboard by clicking on “Start Trading”.
2. Connect your wallet and choose “Leverage” on the trading dashboard.

If it’s your first time using the leverage feature on bitoftrade, you’ll need to approve the procedure in five simple steps:

1. Click “Link Wallet” and approve by signing two requests.
2. Click “Create an Account”. This will create a leverage account linked to your wallet.
3. Click “Approve USDC”. This is a one-time procedure (and includes gas fees) that approves our smart contracts to interact with your USDC balance. This step may take a few minutes.
4. Deposit USDC to your leverage account. Leverage trading operates in USDC, so please make sure you have USDC in your wallet and ETH to pay for gas fees. This step may take a few minutes.
5. After you have a positive balance in your account you can start trading. Our leveraged features include **Market Orders**, **Limit Orders**, **Stop Limit Orders,** and the ability to both **Deposit** and **Withdraw** funds. Choose your leveraged token and the rest of the terms of the order.
6. Click “Confirm” to view your transaction summary, including all estimated fees.
7. Confirm your transaction, and you’re all set. You can see your open positions at all times and close if needed.

&#x20;

For a short walkthrough of leverage trading on our platform watch our short tutorial:

{% embed url="<https://www.youtube.com/watch?v=_aj8h0H7OVw>" %}

{% embed url="<https://www.youtube.com/watch?v=Yjwt7hALGPI>" %}

\
To learn more about leverage read [The Art of Leveraged Trading: A Professional Approach](https://bitoftrade.com/blog/the-art-of-leveraged-trading-a-professional-approach)


# How to use the Markets page?

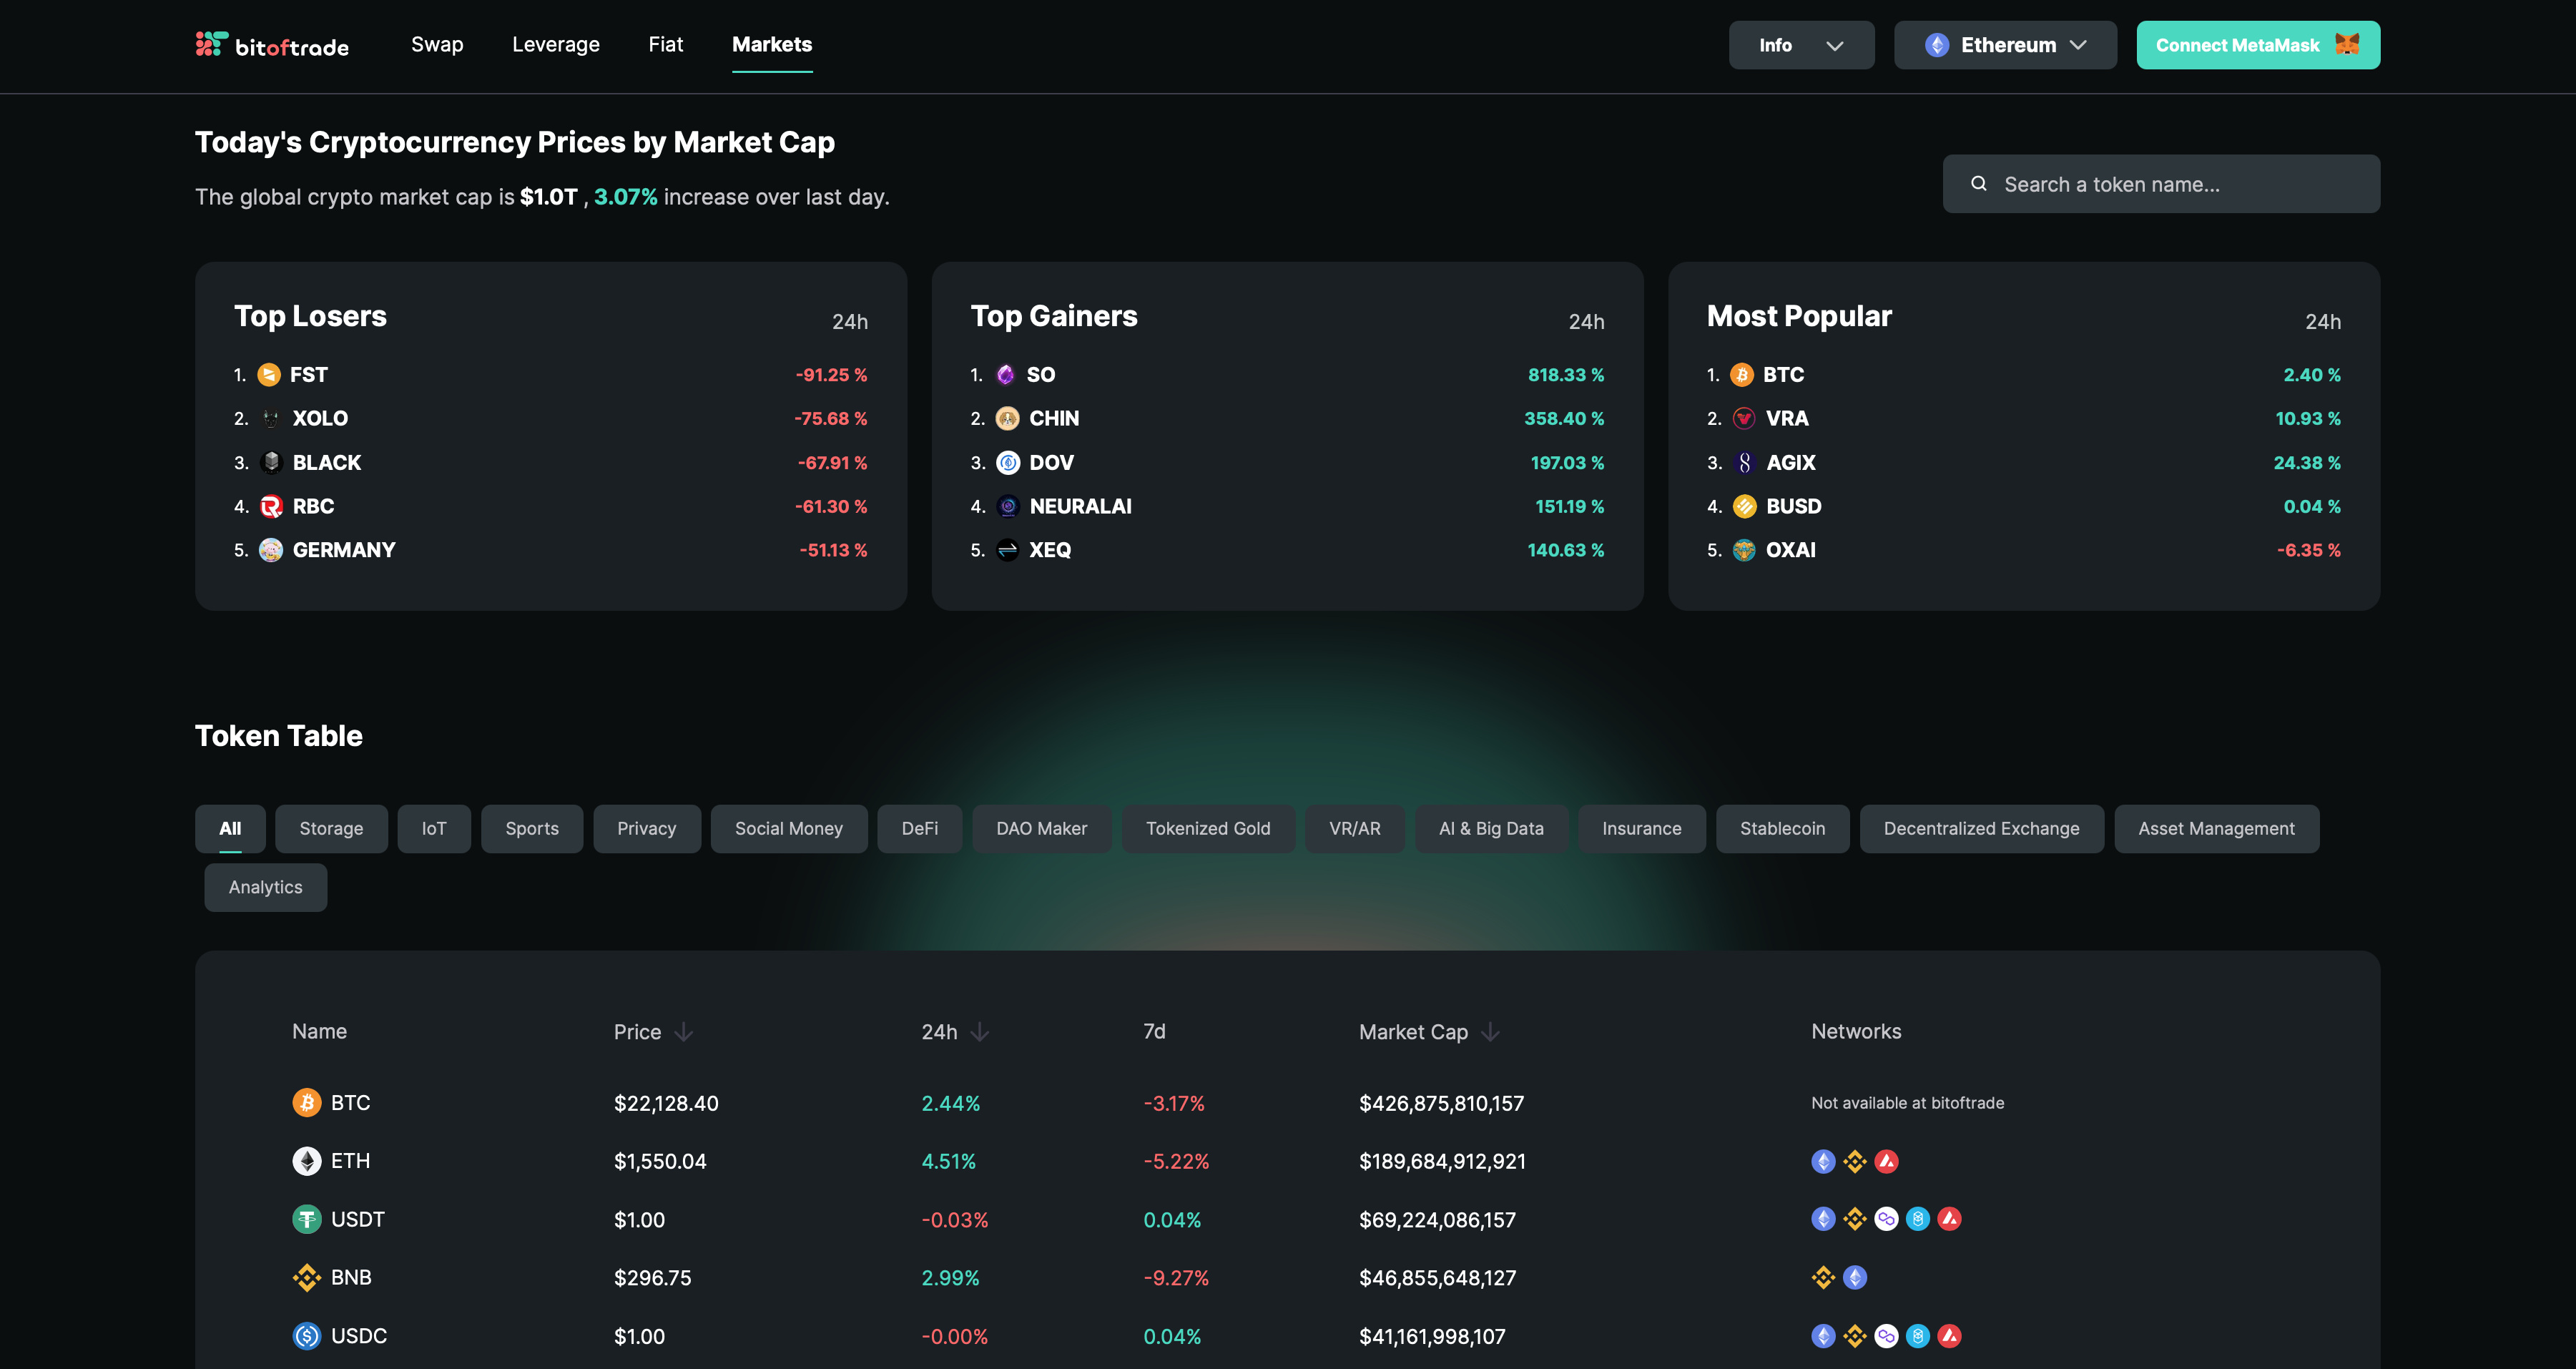
If you have ever used price tracking websites, it will not be difficult for you to use the [bitoftrade Markets Page](https://bitoftrade.com/markets).

However, if all this is new for you, we will now tell you everything you need to start!

Our Markets page is designed to simplify your path to crypto analysis and asset selection for trading.

<figure><img src="https://707480146-files.gitbook.io/~/files/v0/b/gitbook-x-prod.appspot.com/o/spaces%2FxegFG0slk40bOOCouVQE%2Fuploads%2FqURqJACEAym2uUrdG86e%2Fmarkets.png?alt=media&amp;token=329f9437-14b5-4aca-9bd9-686286f47057" alt=""><figcaption></figcaption></figure>

&#x20;1\. Token lists of TOP losers/gainers and the most trending crypto will help you understand what cryptocurrencies are most discussed in the crypto space right now.&#x20;

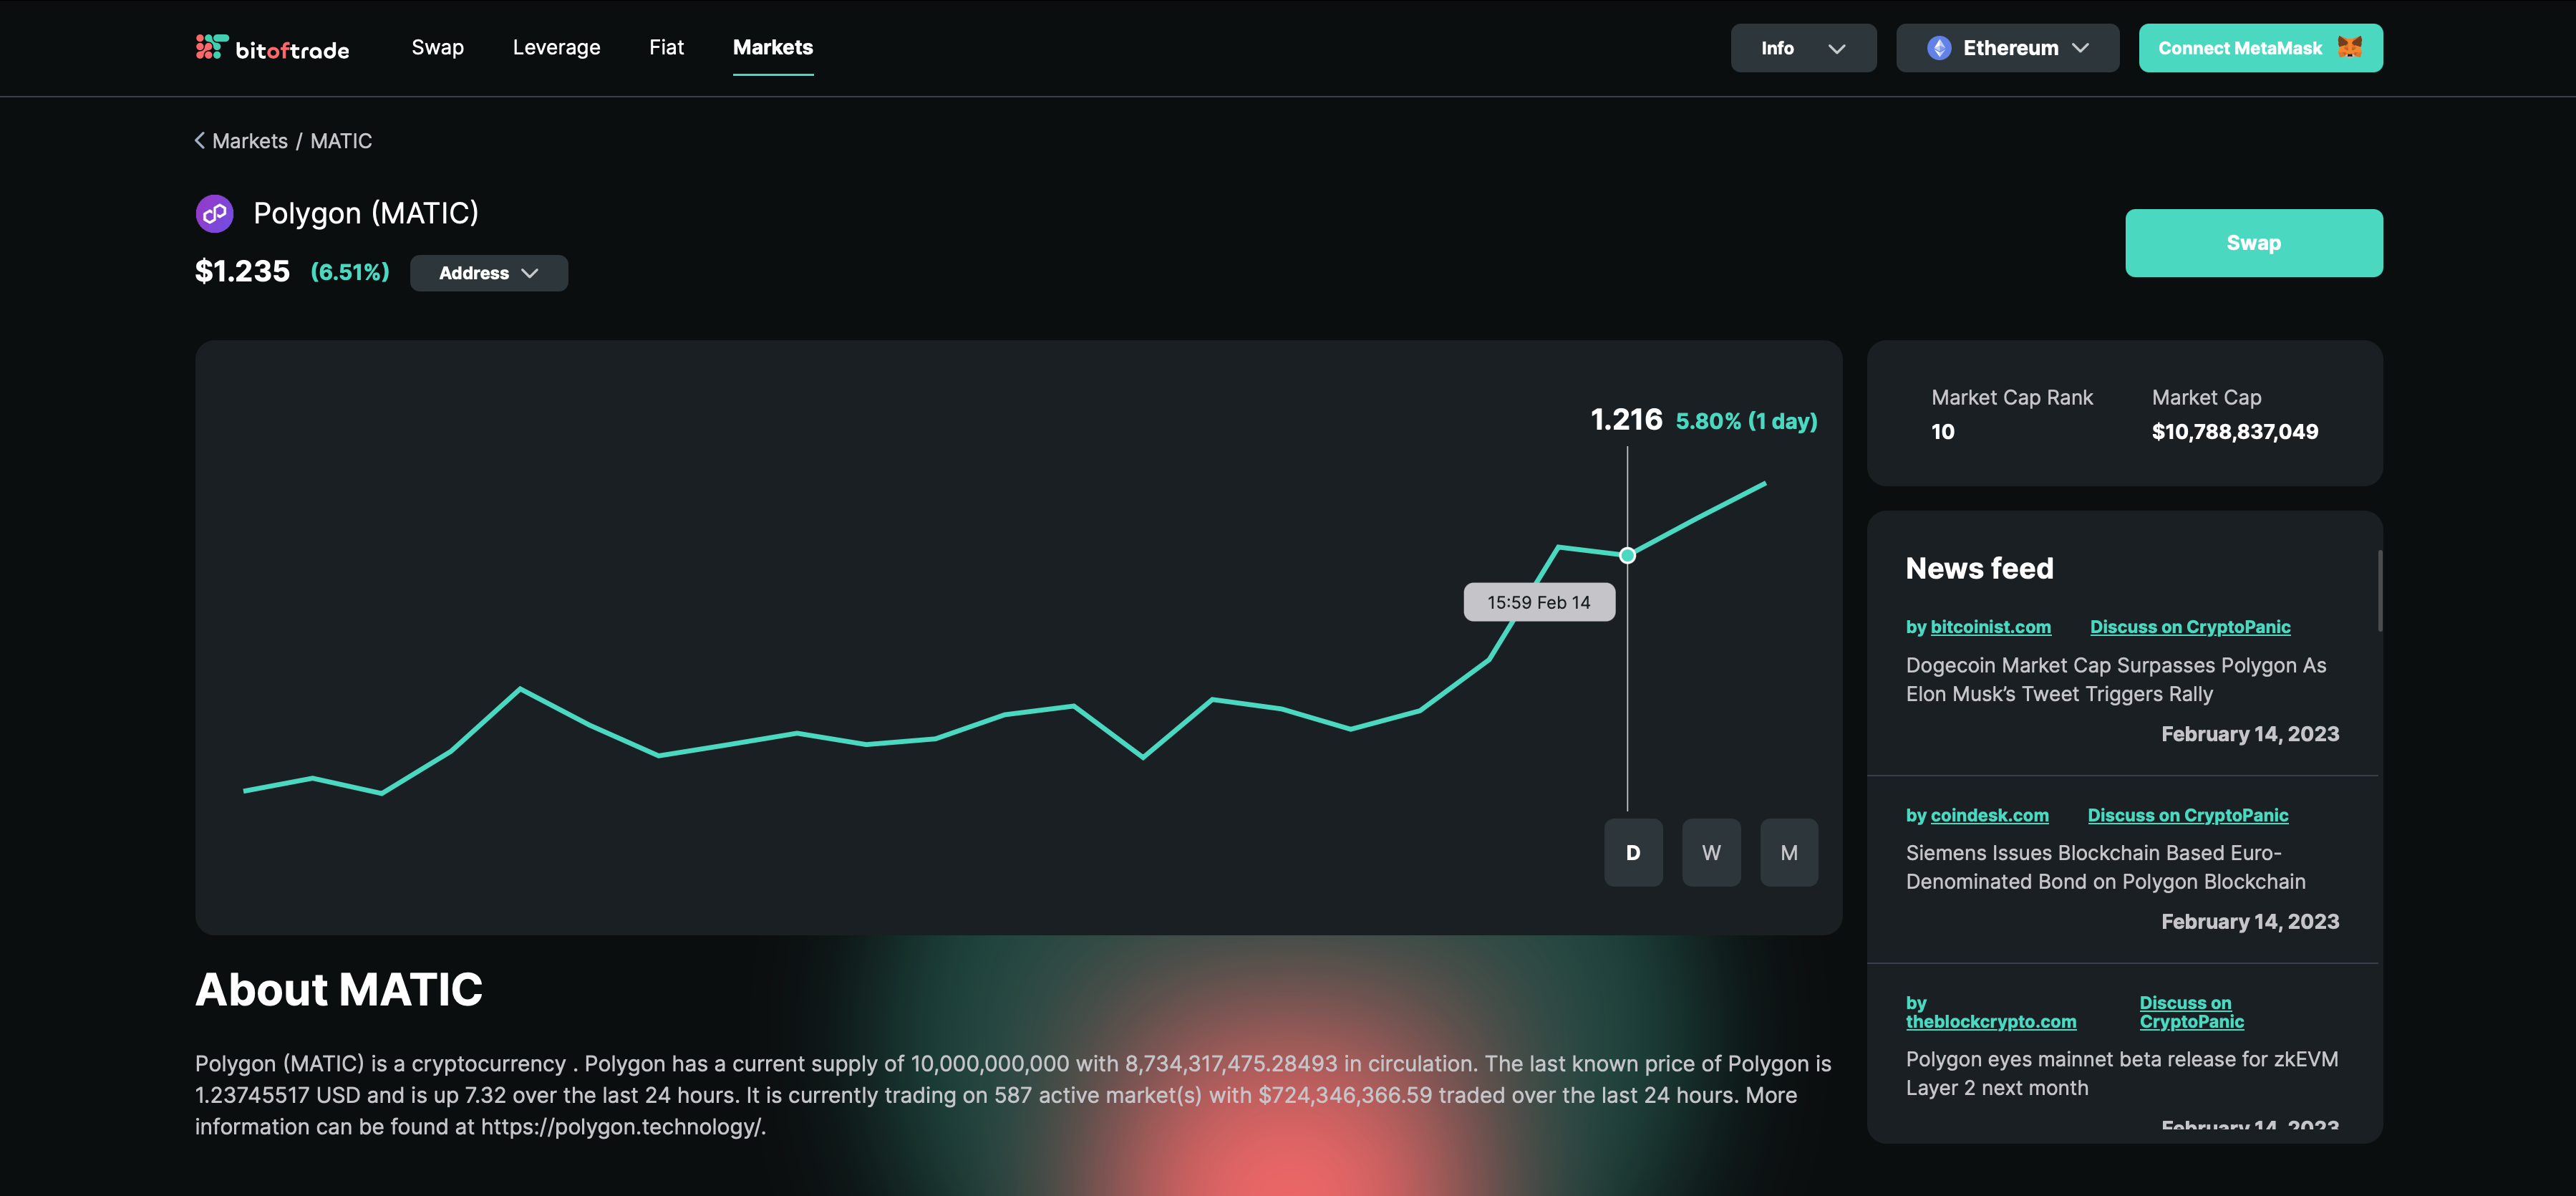
But besides that, by clicking on a specific token, you can see price changes for a day/week/month and make predictions about price movement in the long term:&#x20;

<figure><img src="https://707480146-files.gitbook.io/~/files/v0/b/gitbook-x-prod.appspot.com/o/spaces%2FxegFG0slk40bOOCouVQE%2Fuploads%2FEZ4DvHjRcIAfnEflgTtX%2Fmarkets%20token.png?alt=media&amp;token=bcc25a2e-a25f-47df-b63a-018e9a084eb4" alt=""><figcaption></figcaption></figure>

&#x20;2\. On the Markets page, you can find up-to-date information about most of the traded cryptocurrencies.&#x20;

Copy the token address, read the most relevant posts and mentions in the media, and see a brief description — everything that will help you get a general idea of the asset you are searching for.&#x20;

<figure><img src="https://707480146-files.gitbook.io/~/files/v0/b/gitbook-x-prod.appspot.com/o/spaces%2FxegFG0slk40bOOCouVQE%2Fuploads%2FUiarVgbU9iv1yHGQncPw%2Fmarkets%20token%20adresses.png?alt=media&amp;token=0e3c6fbe-ea8b-42cf-833c-7703d36d9be9" alt=""><figcaption></figcaption></figure>

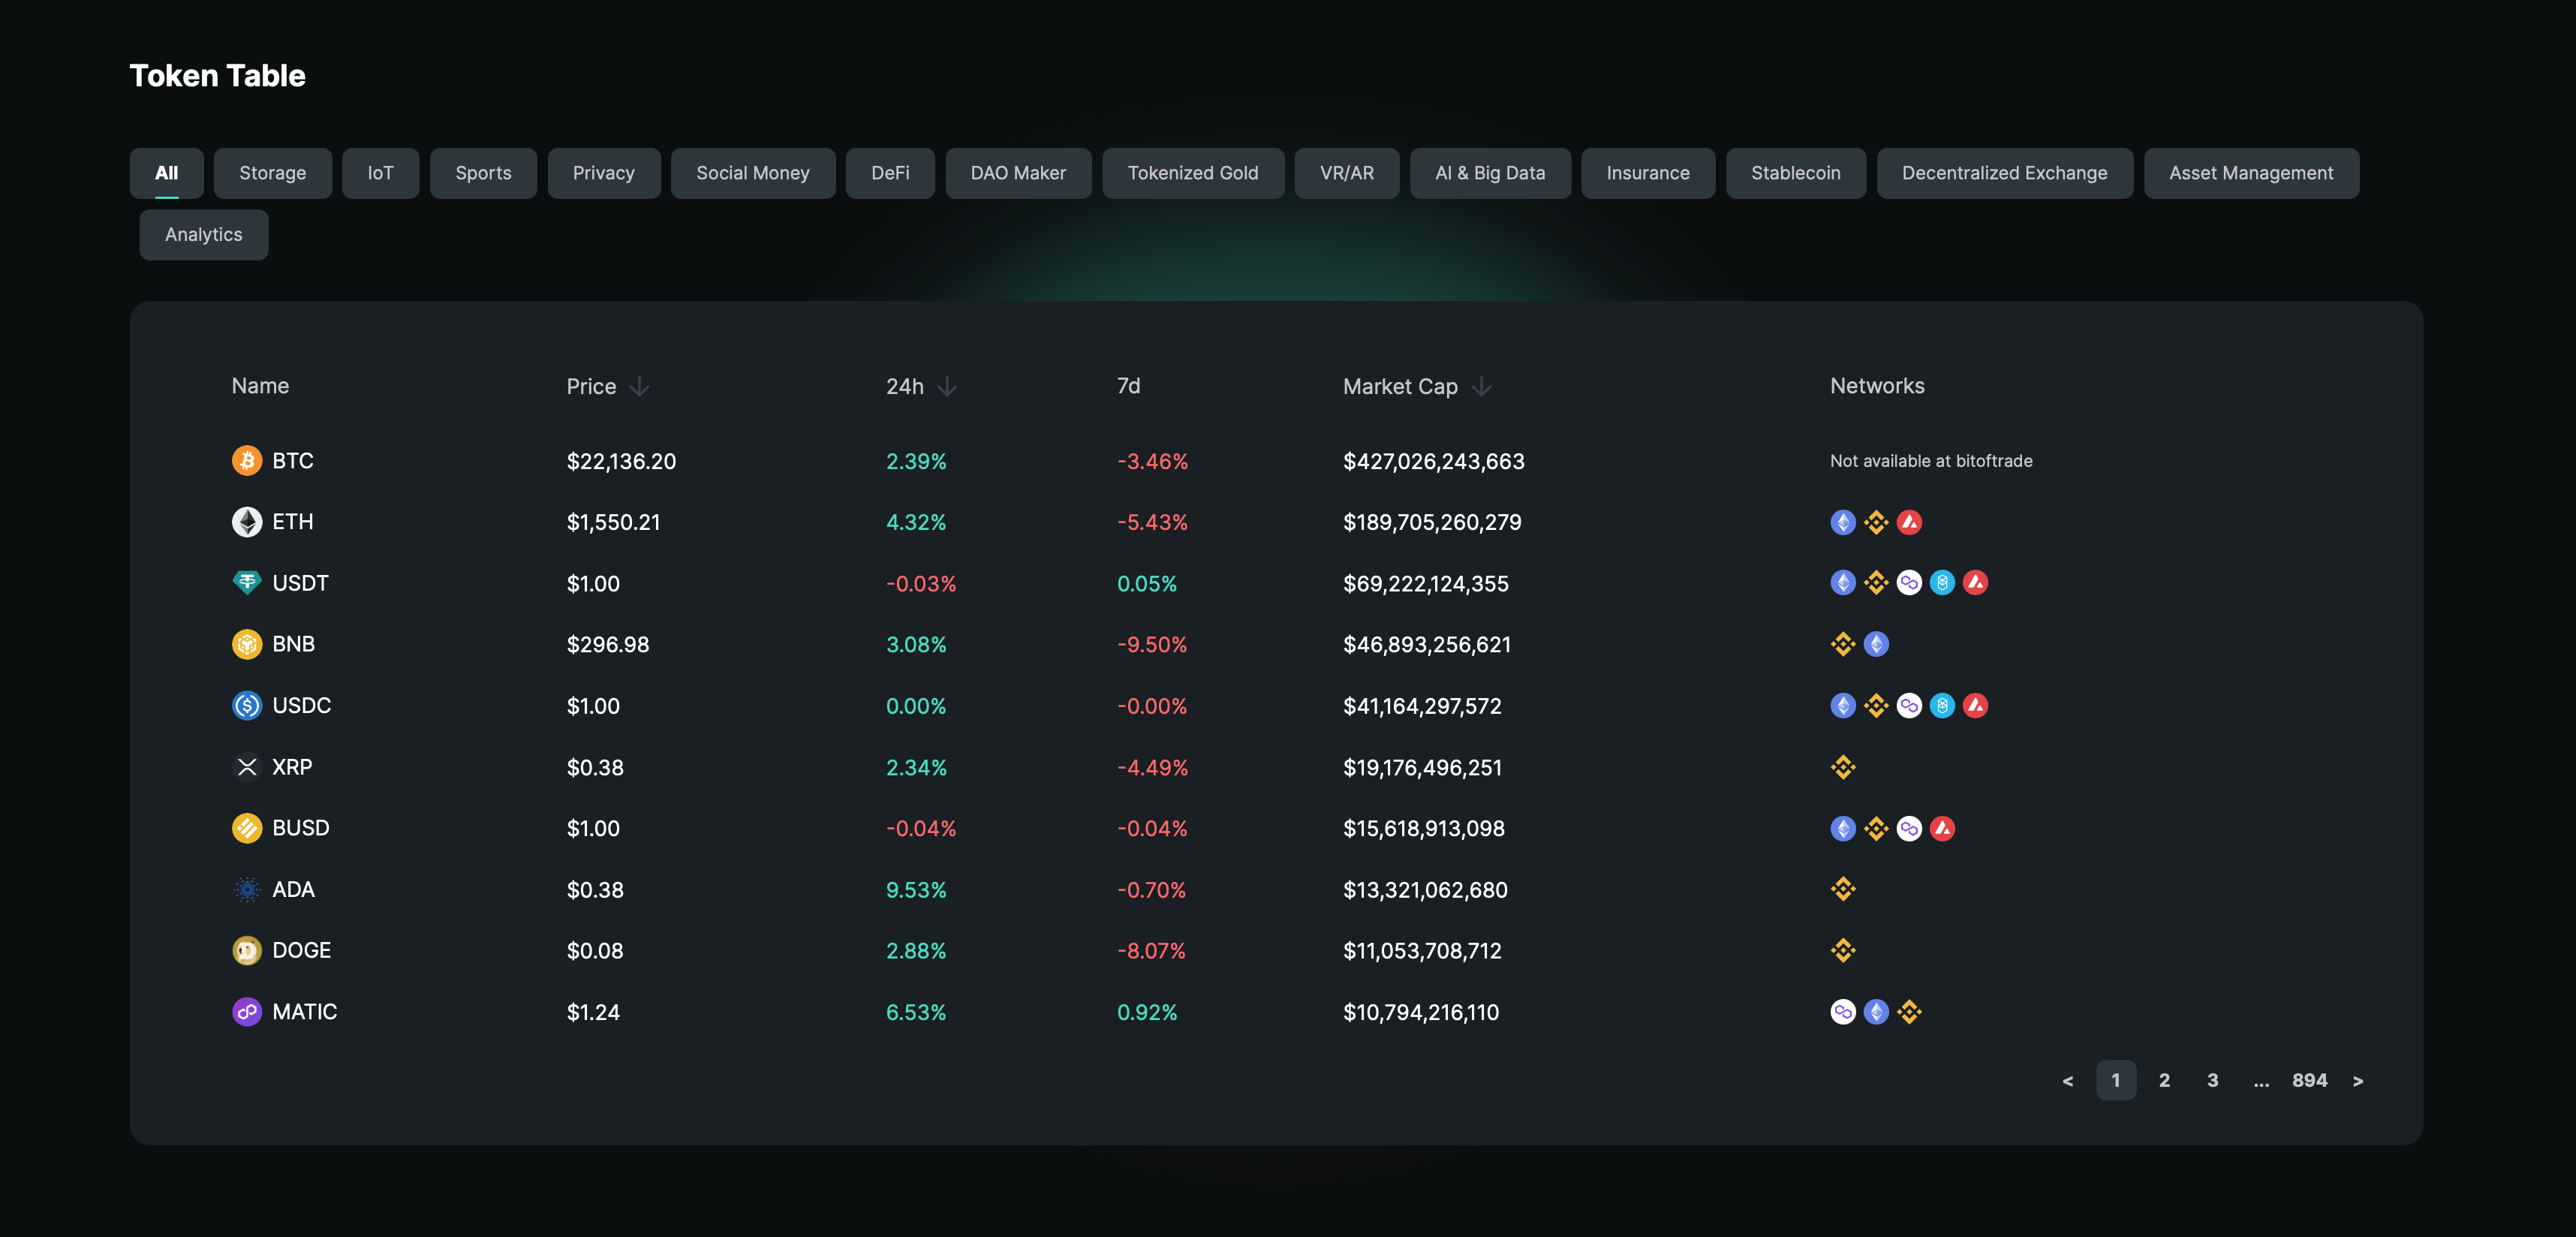
3. The Token Table automatically ranks indicators about crypto projects of various purposes and specifics:

<figure><img src="https://707480146-files.gitbook.io/~/files/v0/b/gitbook-x-prod.appspot.com/o/spaces%2FxegFG0slk40bOOCouVQE%2Fuploads%2FUrkwz7QuTdIGOmhfcuYr%2Fmarkets%20table.png?alt=media&amp;token=ad3bf430-aa34-47e8-85d7-3c726f9ef29e" alt=""><figcaption></figcaption></figure>

So, you can find out, for example, about the native tokens of decentralized exchanges — the price, total market cap and on which networks it is possible to trade on bitoftrade.


# How to place limit order?

#### Learn more about limit trading with bitoftrade

Are you looking to make good earnings from limit trading? We’ve got you covered!

Limit orders are used for long-term traders, so if you’re looking to make the most out of trading opportunities limit orders are ideal for you. With a limit order, you can buy and sell tokens that offer you greater profit potential. Limit orders allow you to place restrictions on the maximum and minimum pricing. There are different types of limit orders, and some can be triggered when specific conditions are met.

At bitoftrade, we offer advanced tools such as limit orders. Our smart widget allows you to exchange almost all of the most popular tokens and cryptocurrencies. By trading with limit orders, you can place a limit on price risk when trying to swap an asset.

&#x20;

Read our article [The Fundamentals of Crypto Limit Order Trading](https://bitoftrade.com/blog/the-fundamentals-of-crypto-limit-order-trading) for some handy tips and more information on limit orders.

&#x20;

You can start placing limit orders on bitoftrade in six simple steps:

1. Go to our trading dashboard by clicking on “Start Trading”.
2. Connect your wallet and choose “Limit” on the trading dashboard.
3. Set your trading pair by searching for a specific token by name, determining the number of tokens you want to trade, the time your order will stay open, and the target price.
4. Click on the "Confirm Limit" button. If you’re trading with a token for the first time you’ll have to unlock it. This is a one-time process and requires signing in to MetaMask or Trust Wallet and paying any gas fees costs.
5. Click “Confirm” and you’ll see your transaction summary, including all estimated fees. Then, your wallet will open automatically.
6. After approving the order on your wallet, you’ll be able to see its status in the “Transaction History” section at the bottom of the page.

**Important note:** Your transaction will occur only if the market conditions meet your limit order.

&#x20;

For a short walkthrough of limit trading on our platform watch our fun tutorial below:

{% embed url="<https://www.youtube.com/watch?v=_aj8h0H7OVw>" %}


# Fees

We offer a competitive rate for each of our platform’s trading tools. For each feature, fees are as follows:

#### Leverage:

**Deposits**&#x20;

* Gas fees for deposits are paid in ETH by the user.&#x20;

**Withdrawals**&#x20;

* Gas fees for withdrawals are paid in USDC by the user.&#x20;
* The user pays 0.1% in USDC for fast withdrawals to dYdX.&#x20;

**Market orders**&#x20;

* Paid in USDC.&#x20;
* Opening a position - the user pays 0.05%.&#x20;
* Closing a position - 0.05% is paid by the user.&#x20;

**Limit orders**&#x20;

* Limit orders are paid in USDC.&#x20;
* User pays 0.02% as a “Maker”.&#x20;
* User pays 0.05%. as a “Taker”.

**Stop-loss**

* Paid in USDC.&#x20;
* User pays 0.02% as a “Maker”.&#x20;
* As a “Taker” the user pays 0.05%. &#x20;

**Liquidation**&#x20;

* User pays 1% in USDC to the dYdX liquidator.&#x20;

#### Swaps:&#x20;

* Gas fees.&#x20;

#### Limit orders:&#x20;

* No fees.&#x20;
* User is responsible for the fee paid to Ethereum miners to validate the transaction on the blockchain.&#x20;
* On the Layer 2 Perpetual product for fast withdrawals, a 0.1% fee is paid to cover the cost of the liquidity required to execute the fast withdrawal.

&#x20;

When utilizing the leverage trading feature, you will pay gas fees for withdrawals in USDC.&#x20;

#### Maker-Taker:&#x20;

A maker-taker fee model is used to determine trade fees on bitoftrade.&#x20;

**Maker** orders provide depth and liquidity to the order book, while **taker** orders remove liquidity from the order book. Users are charged a different fee depending on which of the two types of orders they’re utilizing.&#x20;

&#x20;

**There is complete transparency with bitoftrade, so you needn’t worry about hidden costs! You’ll receive a full breakdown of the total fees required to complete a transaction before it’s executed.**


# FAQ

<details>

<summary>What  protocols bitoftrade utilizes?</summary>

&#x20;[dYdX](https://dydx.exchange/) for leverage trades

&#x20;[0x](https://www.0x.org/) for limit orders

&#x20;[ParaSwap](https://www.paraswap.io/) for simple swaps\
\
[bitoftrade](https://bitoftrade.com) for cross chain swaps

</details>

<details>

<summary>How secure is bitoftrade?</summary>

At bitoftrade, we take security very seriously. Our platform operates on the blockchain using smart contracts to execute the transactions with non-custodial wallets. This means we don’t record or store your private wallet keys and you remain in full control of your holdings. We use protocols that have been through several security audits.

</details>

<details>

<summary>What countries does bitoftrade support?</summary>

Traders in all countries can use the bitoftrade platform for their trading needs, except for the USA where **only leverage** operations are blocked. Additionally, our main swap service provider, ParaSwap, may block customers with Russian IP addresses at present. However, they can still use leverage and limit services.

\
For more details please read our [terms of service](https://bitoftrade.com/terms).

</details>

<details>

<summary>What is the “estimated fee”?</summary>

#### What you need to know about estimated fees.

Most of the fees on our platform are straightforward, however, gas fees are estimated. Not every trade you make across the networks will be the same, so fees will vary depending on the amount you trade. However, at bitoftrade, we pride ourselves on transparency so you’ll know all the platform fees before you execute every transaction.

You can check gas fees for each available network here:

[Ethereum](https://etherscan.io/gastracker)

[Polygon](https://polygonscan.com/gastracker)

[Fantom](https://ftmscan.com/gastracker)

[BSC](https://bscscan.com/gastracker)

[Avalanche](https://snowtrace.io/gastracker)

</details>


# AllPay Widget

Welcome to the bitoftrade Widget. It is a customizable web object that can be embedded into **any** webpage, enabling your users to link their wallets, make cryptocurrency payments, trade fungible tokens, and purchase NFT all without ever leaving the hosting website.

The widget supports EVM-compatible networks such as Ethereum, Polygon, BSC, Avalanche, Fantom, and soon our bitoftrade cross-chain operations. Additionally, it supports every ERC-20 token, thus unlike other platforms, your client is not constrained to just a few.

### What can I do with it?

1. Build your own DeFi exchange
2. Sell your ERC-20 tokens or NFT
3. Get crypto payments

You can check more examples [here](/for-businesses/allpay-widget/use-cases).

### Upcoming soon

At the moment we are supporting **token sales,** **swaps,** and **NFT**.

In the near future, we will also provide **crypto payments** for businesses, so stay tuned!


# Use cases

Whether you are a token owner who wants to get crypto payments or an NFT collector who wants to sell your collection, the AllPay widget is the solution for you!

Check out our cool examples of how you can use it and upgrade your business.


# Token Owners

bitoftrade widget offers a 'Sale' option where you can customize it according to your website's needs, define a token contract, and networks.

Let's explore an example of implementation for a token sale.&#x20;

Igor is a blockchain P2E project developer who sells CHY on other exchanges. To buy the token you must redirect to another hosting site. With the bitoftrade widget, the project will be able to place a token sale option inside its website and let its users buy CHY organically.

First, users unlock the asset they are paying with (yes you can choose any available token on your balance).

<figure><img src="https://707480146-files.gitbook.io/~/files/v0/b/gitbook-x-prod.appspot.com/o/spaces%2FxegFG0slk40bOOCouVQE%2Fuploads%2Fior2k4ZF1LjfFv1YAoN4%2FUnlock.png?alt=media&amp;token=f173e4c6-b188-4505-b8ba-c944256195f6" alt=""><figcaption></figcaption></figure>

And after, purchase CHY directly to their wallet!&#x20;

<figure><img src="https://707480146-files.gitbook.io/~/files/v0/b/gitbook-x-prod.appspot.com/o/spaces%2FxegFG0slk40bOOCouVQE%2Fuploads%2F4a19jbec5DV1iitevYxi%2FChy%20token.png?alt=media&amp;token=e2110648-bfa6-40e8-b788-7c325b5a5eb4" alt=""><figcaption></figcaption></figure>

All you need to do is follow the instructions [here](/for-businesses/allpay-widget/quick-start).


# Personal Exchange

The bitoftrade widget includes a 'Swap' option that allows you to tailor it to the needs of your website and specify which networks you want to use.&#x20;

For example, Alice is a DeFi blogger who runs a 200K size community. Alice wants to include an exchange as part of her token reviews. With the bitoftrade widget, Alice can easily integrate a customized DEX in her blog.

<figure><img src="https://707480146-files.gitbook.io/~/files/v0/b/gitbook-x-prod.appspot.com/o/spaces%2FxegFG0slk40bOOCouVQE%2Fuploads%2FYSwIVUYW77pMi1MBR8Wp%2Fswaap%402x.png?alt=media&amp;token=f81e80f6-a5be-45f9-b4f2-12dc267b9c7e" alt=""><figcaption></figcaption></figure>


# Creators

If you're an artist or an NTF collector, our widget is the answer!

With the bitoftrade widget, you can easily create a panel that matches your portfolio style and list your collection for sale.

Let's look at an example of NFT sale implementation.

Bob, a famous artist, has decided to create an NFT collection and wants to promote it on his website. He chose to use the AllPay widget to pre-sell some of the collection's goods on his website.

First He has to list his collection in his bitoftrade portfolio, define the sale parameters and customize it according to his style.

<figure><img src="https://707480146-files.gitbook.io/~/files/v0/b/gitbook-x-prod.appspot.com/o/spaces%2FxegFG0slk40bOOCouVQE%2Fuploads%2FBpwJN71Cd5hABJXhoj9D%2FNFT%402x.png?alt=media&amp;token=fe32a472-2ae6-4c06-97b8-61ea7c129479" alt=""><figcaption></figcaption></figure>

Then, paste the code into his website and that's it! Now bob has his own NFT collection sale on his website.

All you need to do is follow the instructions [here](/for-businesses/allpay-widget/quick-start/nft-widget-integration).


# GameFi, Metaverse

If you're a game owner who needs NFT sale, this is for you.

Xena and her friends are developing a Web3 game. Players are intended to buy and sell NFT items to improve their characters inside the game.

With the AllPay widget, Xena can embed the NFT trading experience directly into the gameplay in a few easy steps and let the players buy/sell items to get ahead in the game.

All you need to do is follow the instructions [here](/for-businesses/allpay-widget/quick-start/nft-widget-integration).


# Crypto Payments (soon)

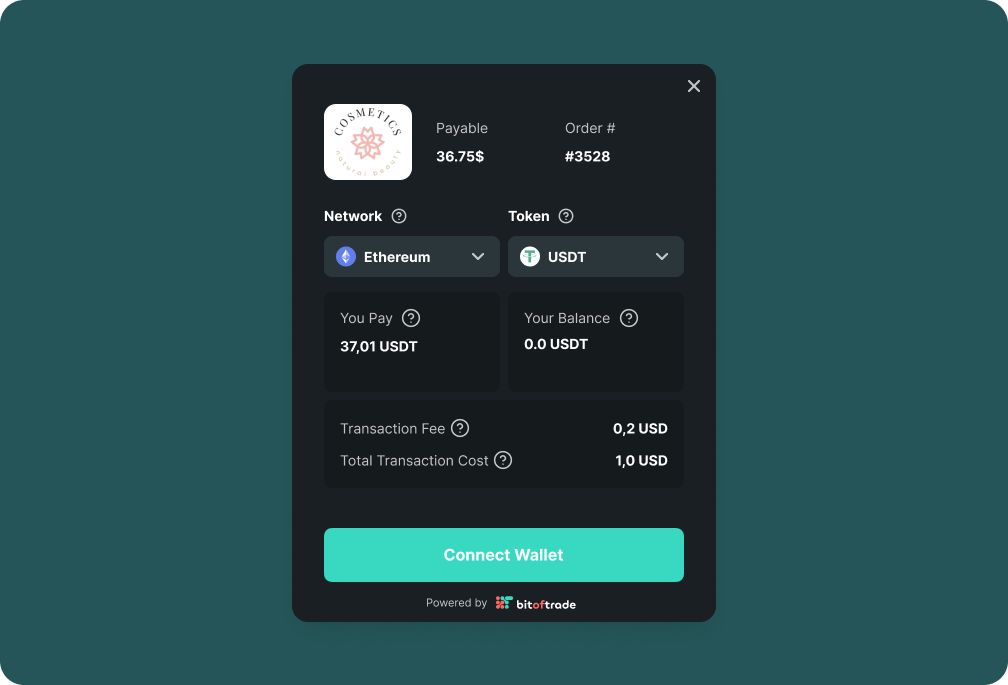
Anna owns an online cosmetics store and would like to begin accepting cryptocurrency payments for her products. With the AllPay widget, she can let her customers checkout their cart by connecting their crypto wallet and sending crypto as payment.

<figure><img src="https://707480146-files.gitbook.io/~/files/v0/b/gitbook-x-prod.appspot.com/o/spaces%2FxegFG0slk40bOOCouVQE%2Fuploads%2Fas7vzxHidtICoZHQCzni%2Fe-commerce.png?alt=media&amp;token=7714d44e-d3ef-4a85-be0d-78d4e1c9d0e5" alt=""><figcaption></figcaption></figure>


# Quick start

Everything you need to know to build your own widget

This tutorial shows you how to embed the crypto widget in your website easily, regardless of whether your website already functions as a decentralized application (dApp). Your users can swap ERC-20 tokens and buy/sell NFTs with the bitoftrade AllPay widget without ever leaving your website!

In this chart you can recognize the flow of the implementation of your widget:

<figure><img src="https://707480146-files.gitbook.io/~/files/v0/b/gitbook-x-prod.appspot.com/o/spaces%2FxegFG0slk40bOOCouVQE%2Fuploads%2FqhDzUF3BqKKrhUMJNR41%2Fimage.png?alt=media&amp;token=eb53fa50-e8b1-4d97-99bd-3c139a8d513e" alt=""><figcaption></figcaption></figure>

Here's a preview of your future widget:&#x20;

<figure><img src="https://707480146-files.gitbook.io/~/files/v0/b/gitbook-x-prod.appspot.com/o/spaces%2FxegFG0slk40bOOCouVQE%2Fuploads%2Fa6XkvdrwXigXed2OPVCT%2Fimage.png?alt=media&amp;token=c916c62d-0f06-4c89-ab08-72f7c6170a57" alt=""><figcaption></figcaption></figure>

By adjusting the widget's colors, font, and token list to match your app's theme, you can make it appear as though it was always there. This manual will show you how.

###


# Customization Panel

Adjust your widget on the customization panel.

You can choose the widget type, backgrounds, colors, functionality, tokens, and more...

<figure><img src="https://707480146-files.gitbook.io/~/files/v0/b/gitbook-x-prod.appspot.com/o/spaces%2FxegFG0slk40bOOCouVQE%2Fuploads%2F7PXC1XYs3HtfE7RPrsrH%2Fimage.png?alt=media&amp;token=c4c88777-0741-4979-9c48-ae7b30e6d1a4" alt=""><figcaption></figcaption></figure>

After you are satisfied with the amazing widget you created, you'll be ready to start the integration part. Notice that all you need is at the bottom of the page under "Integration", no installations are needed!


# Swap and Sale Integration

Place this script tag on the `<body>` of your page:

```html
<script src="https://unpkg.com/@bitoftrade/crypto-trading-widget-sdk/build/index.js"
type="text/javascript"></script>
```

[Create a `<div>` tag where you want to locate the widget:](#user-content-fn-1)[^1]

<pre class="language-html"><code class="lang-html"><strong>&#x3C;div id="widget">&#x3C;/div>
</strong></code></pre>

Add this to the \<script> tag at the bottom of the \<body> tag:

<pre class="language-html"><code class="lang-html">&#x3C;script>
  const <a data-footnote-ref href="#user-content-fn-2">configuration</a> = {
    palletOverrides: { 
      "primary": "#38D9C0",
      "secondary": "#2B363B",
      "paper": "#1A1F23",
      "text-primary": "#fff",
      "text-secondary": "#C5C9C9",
      "text-primaryButton": "#fff",
      "text-secondaryButton": "#C5C9C9",
      "secondaryButton": "#255558",
      "success": "#38D9C0",
      "error": "#FF6666",
      "warning": "#FF7A2A",
    },
    chainOptions: { 
      '<a data-footnote-ref href="#user-content-fn-3">0x1</a>': {
        enabled: true,
        defaultTokenAddress: "<a data-footnote-ref href="#user-content-fn-4">0x111111111117dc0aa78b770fa6a738034120c302</a>",
      },
      '0x89': {
        enabled: true,
        defaultTokenAddress: "0x5ceebb0947d58fabde2fc026ffe4b33ccfe1ba8b",
      },
      '0xfa': {
        enabled: true,
        defaultTokenAddress: "0x6a07a792ab2965c72a5b8088d3a069a7ac3a993b",
      },
      '0x38': {
        enabled: true,
        defaultTokenAddress: "0x3ee2200efb3400fabb9aacf31297cbdd1d435d47",
      },
      '0xa86a': {
        enabled: true,
        defaultTokenAddress: "0x60781c2586d68229fde47564546784ab3faca982",
      },
    },
    widgetType: "swap",
  };
<a data-footnote-ref href="#user-content-fn-5">  CryptoTradingWidget.tradingWidget('widget', configuration); </a>
&#x3C;/script>
</code></pre>

Here is the full code :smile:

```html
<!DOCTYPE html>
<html lang="en">
<head>
    <meta charset="UTF-8">
    <meta http-equiv="X-UA-Compatible" content="IE=edge">
    <meta name="viewport" content="width=device-width, initial-scale=1.0">
    <title>Widget Demo</title>
</head>
<body>
<script src="https://unpkg.com/@bitoftrade/crypto-trading-widget-sdk/build/index.js"
type="text/javascript"></script>
<div id="widget"></div>
<script>
  const configuration = {
    paletteOverrides: { 
      "primary": "#38D9C0",
      "secondary": "#2B363B",
      "paper": "#1A1F23",
      "text-primary": "#fff",
      "text-secondary": "#C5C9C9",
      "text-primaryButton": "#fff",
      "text-secondaryButton": "#C5C9C9",
      "secondaryButton": "#255558",
      "success": "#38D9C0",
      "error": "#FF6666",
      "warning": "#FF7A2A",
    },
    chainOptions: { 
      '0x1': {
        enabled: true,
        defaultTokenAddress: "0xa0b86991c6218b36c1d19d4a2e9eb0ce3606eb48",
      },
      '0x89': {
        enabled: true,
        defaultTokenAddress: "0x2791bca1f2de4661ed88a30c99a7a9449aa84174",
      },
      '0xfa': {
        enabled: true,
        defaultTokenAddress: "0x04068da6c83afcfa0e13ba15a6696662335d5b75",
      },
      '0x38': {
        enabled: true,
        defaultTokenAddress: "0x8ac76a51cc950d9822d68b83fe1ad97b32cd580d",
      },
      '0xa86a': {
        enabled: true,
        defaultTokenAddress: "0xb97ef9ef8734c71904d8002f8b6bc66dd9c48a6e",
      },
    },
    widgetType: "swap",
  };
  CryptoTradingWidget.tradingWidget('widget', configuration); 
</script>
</body>
</html>
```

[^1]: is this div actually necessary tech-wise? The widget will be displayed as an overlay anyway, right? Why we don't inject it into the body transparently/automatically?&#x20;

[^2]: default customization without showing here if not necessary

[^3]: chnage to decimals / name

[^4]: is it necessary to add defaultTokenAddress?&#x20;

[^5]: it doesn't explain how I make the widget appear upon clicking on some button. This instruction rather explains how do I display the widget upon page render


# NFT Widget Integration

In this section, you will find information on how to implement your NFT widget. It contains two stages.&#x20;

The first is to list your NFT and generate a listing id. This is a crucial detail and without it, you wouldn't be able to integrate your widget and sell your NFT.

The second phase is the code integration where you'll have to use the generated listing id.

It is important to mention that at the moment an NFT widget can only sell one listing at a time. If you'd like to list more than one, you will have to use multiple widgets and integrate them into your website.


# NFT Listing

Create a listing ID before integrating an NFT widget type.

If you chose to implement an NFT widget in your website, this section is very important before you start the integration phase.&#x20;

### How do I list my NFT?

Our widget has the ability to detect your NFTs in your wallet, create a listing and attach it to a certain widget.&#x20;

First, click on 'Go listing' on the customization panel.

<figure><img src="https://707480146-files.gitbook.io/~/files/v0/b/gitbook-x-prod.appspot.com/o/spaces%2FxegFG0slk40bOOCouVQE%2Fuploads%2FZ8fZmwZJ0cg3l4jmCg10%2Fimage.png?alt=media&amp;token=b055d828-0d1b-4f4c-9d60-1c2644926f66" alt=""><figcaption></figcaption></figure>

This will redirect you to your portfolio page, where you'll need to connect your wallet and see all your NFTs.

<figure><img src="https://707480146-files.gitbook.io/~/files/v0/b/gitbook-x-prod.appspot.com/o/spaces%2FxegFG0slk40bOOCouVQE%2Fuploads%2Fgpj9QNMYmAZXTXTpkSrV%2Fimage.png?alt=media&amp;token=d0d9463c-aad4-4c38-8565-69a9dd811bb3" alt=""><figcaption></figcaption></figure>

On this page, you'll be able to create a listing order by choosing the one that you'd like to sell and defining the price and the time range for the sale.&#x20;

<figure><img src="https://707480146-files.gitbook.io/~/files/v0/b/gitbook-x-prod.appspot.com/o/spaces%2FxegFG0slk40bOOCouVQE%2Fuploads%2FKoEXhX3gg75Srh9p0w4p%2Fimage.png?alt=media&amp;token=bbf13745-4930-4bf9-9bb7-1ded922aec9c" alt=""><figcaption></figcaption></figure>

After you confirm the listing you will be able to see it in the 'Orders' table on the same page and keep track of all your listings.

<figure><img src="https://707480146-files.gitbook.io/~/files/v0/b/gitbook-x-prod.appspot.com/o/spaces%2FxegFG0slk40bOOCouVQE%2Fuploads%2F8jQjT7aqGrd1H1YwbDpW%2Fimage.png?alt=media&amp;token=4a5b9ea2-be9f-4dbf-b38c-bdab1dc15112" alt=""><figcaption></figcaption></figure>

Now we got to the most important part. The listing ID!&#x20;

<figure><img src="https://707480146-files.gitbook.io/~/files/v0/b/gitbook-x-prod.appspot.com/o/spaces%2FxegFG0slk40bOOCouVQE%2Fuploads%2FDgmG5F28E7SxFRNR3b9K%2Fimage.png?alt=media&amp;token=ab6ac9f7-31ba-4945-8bfb-73dd873876e3" alt=""><figcaption></figcaption></figure>

Our system will generate a listing code that you'll need to paste into the widget script during the integration phase. You'll find it in the 'Orders' table. Copy it and save it for our next stage.&#x20;


# Code Integration

First, c[reate a `<div>` tag where you want to locate the widget:](#user-content-fn-1)[^1]&#x20;

```html
<div id="widget"></div>
```

To initialize the widget add this to the script tag at the bottom of the`<body>` tag:

```html
<script>
  const configuration = {
    paletteOverrides: {
      paper: "#1A1F23",
      secondary: "#2B363B",
      "text-primary": "#fff",
      "text-secondary": "#C5C9C9",
      primary: "#38D9C0",
      "text-primaryButton": "#fff",
      paperSecondaryBackground: "undefined",
    },
    widgetType: "nft",
  };

  const script = document.createElement("script");
  script.src =
    "https://bofdevstorage.blob.core.windows.net/blobcontainer/crypto_trading_widget_sdk/index.js";
  document.head.appendChild(script);
  script.onload = () => {
    window.CryptoTradingWidget.initNftWidget("widget", configuration);
  };
</script>
```

If you'd like to place an 'Open order' button to trigger the widget you can add an 'onClick' event:

```html
<button id="orderButton">Open order</button>
```

Finally, place the following script in the \<body> with and replace the `orderHash` with your copied listing ID:

```html
<script>
  const button = document.getElementById("orderButton");
  const openOrder = () => {
    const orderHash =
      "0xa35d92dad8c08d24b46ab0a8204768d4a5acbeb4dee21a04fd2616c7d0a5dfac";
    const chainId = 137;
    window.CryptoTradingWidget.openOrder(orderHash, chainId);
  };

  button.onclick = openOrder;
</script>
```

This is the full code :)

```html
<!DOCTYPE html>
<html lang="en">
  <head>
    <meta charset="UTF-8" />
    <meta http-equiv="X-UA-Compatible" content="IE=edge" />
    <meta name="viewport" content="width=device-width, initial-scale=1.0" />
    <title>Widget Demo</title>
  </head>
  <body>
    <div id="widget"></div>

    <script>
      const configuration = {
        paletteOverrides: {
          paper: "#1A1F23",
          secondary: "#2B363B",
          "text-primary": "#fff",
          "text-secondary": "#C5C9C9",
          primary: "#38D9C0",
          "text-primaryButton": "#fff",
          paperSecondaryBackground: "undefined",
        },
        widgetType: "nft",
      };

      const script = document.createElement("script");
      script.src =
        "https://bofdevstorage.blob.core.windows.net/blobcontainer/crypto_trading_widget_sdk/index.js";
      document.head.appendChild(script);
      script.onload = () => {
        window.CryptoTradingWidget.initNftWidget("widget", configuration);
      };
    </script>

    <button id="orderButton">Open order</button>
 
    <script>
      const button = document.getElementById("orderButton");
      const openOrder = () => {
        const orderHash =
          "0xa35d92dad8c08d24b46ab0a8204768d4a5acbeb4dee21a04fd2616c7d0a5dfac";
        const chainId = 137;
        window.CryptoTradingWidget.openOrder(orderHash, chainId);
      };

      button.onclick = openOrder;
    </script>
  </body>
</html>
```

[^1]: is this div actually necessary tech-wise? The widget will be displayed as an overlay anyway, right? Why we don't inject it into the body transparently/automatically?&#x20;


# FAQ

All the questions you might have asked yourself about the widget

<details>

<summary>Is this service free?</summary>

Yes! Anyone can use our widget.

</details>

<details>

<summary>Which networks does the widget support?</summary>

The widget supports multiple EVM-compatible networks such as Ethereum, Polygon, BSC, Avalanche, Fantom, and soon our bitoftrade cross-chain mechanism.

</details>

<details>

<summary>Which tokens does the widget support?</summary>

We support all available tokens on the networks mentioned.

</details>

<details>

<summary>What can I do with the widget?</summary>

There are many specific use cases for the widget, but let's summarize:

1. You can sell any token you'd like.
2. You can run token swapping on your website.
3. You can buy/sell NFT.

</details>

<details>

<summary>How to install the widget?</summary>

Integrating your own customized widget is so easy! You can check the [Quick start](/for-businesses/allpay-widget/quick-start) section to see exactly how to do it yourself.

</details>

<details>

<summary>How to use the widget on my website?</summary>

The [use cases](/for-businesses/allpay-widget/use-cases) section contains numerous examples of how to use this tool to benefit your business.

</details>

<details>

<summary>Do I need to install anything?</summary>

No installations are needed, only the code on the customization page.

</details>


# Cross-Chain Messaging Protocol

An introduction to the bitoftrade's CCMP.

Cross-Chain Messaging Protocol (CCMP) provides a universal flow for developers to build secure services and applications that can send messages across multiple chains.

CCMP is a quick and easy way to trust events from any chain. It relies on the proof of the event that can be verified and used on any chain.&#x20;


# How it works

Cross Chain Messaging Protocol consists of 3 steps:&#x20;

1. Emit event on the SRC chain
2. Verify the event and get proof from the Signer
3. Receive the event on the DEST chain&#x20;

The key part of the protocol is proof of the event. &#x20;

\
[Signer Service](/for-developers/cross-chain-messaging-protocol/how-it-works/signer-service/signer-interface) is responsible for producing proofs, whereas [Signers Registry smart contract](/for-developers/cross-chain-messaging-protocol/how-it-works/signers-registry-contract) is responsible for validation if proof was made by the correct Signer.&#x20;


# Signer Service

Signer service is used to verify specific events. By request the service produces the proof for events. Proof of the event is a signature created by the signer's address.&#x20;

*Under the hood, Signer could implement any protocol to sign messages.*&#x20;

To create an event signature **Signer** signs a specific [`eventHash`](broken://pages/g7yqh32PATsvCWuyRP4n).&#x20;

After the signature was generated, it could be used on your smart contract to verify the event. After successful verification, you could trust this event and do your dApp logic. &#x20;

See the [Signer Interface](/for-developers/cross-chain-messaging-protocol/how-it-works/signer-service/signer-interface) page to get endpoint params to sign the event.&#x20;

You could also interact with our public [Signer](http://20.56.51.41:4000/api/).


# Event Hash

`eventHash` is calculated from the `eventId` and `eventArgs`:&#x20;

```
eventHash = keccak256(eventId,eventArgs)
```

`eventId` is the event params combined together to create a unique id.

```
eventId = EventName + EventChainId + EventContract + EventTransactionHash
```

where:&#x20;

* `EventName` - the name of the event&#x20;
* `EventChainId` - chainId of the transaction with invoked event&#x20;
* `EventContract` - a contract that invoked the event
* `EventTransactionHash` - hash of the transaction with invoked event

`EventArgs` is the event's arguments. All event arguments will be combined in the same order as they were in the event.

```
eventArgs = eventArg_1 + eventArg_2 + ... 
```

For example, for [this](https://etherscan.io/tx/0xa3b1123b8181f27c30f9cae42340325f0fcecf80c7886045dc159a8b8abd9a63#eventlog) `Transfer` event, `eventHash` will be:

```
message=keccak256(
    "Transfer",
    1,
    "0xA0b86991c6218b36c1d19D4a2e9Eb0cE3606eB48",
    "0xa3b1123b8181f27c30f9cae42340325f0fcecf80c7886045dc159a8b8abd9a63",
    "0x974CaA59e49682CdA0AD2bbe82983419A2ECC400",
    "0x59169f3c0e9e3630D0EBa5E5561dC1677D9451F3",
    "1574766820"
    )="0x9d4776df88b0ab9bc77fdd2170fc62ce668886290c49b5306bb003d0a751bdc1"
```


# Signer interface

Each Signer implements an interface.

### Metadata

## Get Signer metadata

<mark style="color:blue;">`GET`</mark> `https://api-ccmp.bitoftrade.com/metadata`

{% tabs %}
{% tab title="200: OK " %}

```json
{
  "name": "signer_name",
  "availableChains": [1, 56, 137],
  "signer": "0x86f3b7f305f9d02e243a28445a15ecb6eeb12288"
}
```

{% endtab %}
{% endtabs %}

`GET /metadata` the endpoint returns an object with the following type:

```json
{
  "name": "signer_name",
  "availableChains": [1, 56, 137],
  "signer": "0x86f3b7f305f9d02e243a28445a15ecb6eeb12288"
}
```

Where:&#x20;

* `name` is the human-recognizable name of the signer
* `availableChains` is the list of supported chains
* `signer` is the address which is used to sign messages

### Sign event

## Get proof of the event

<mark style="color:green;">`POST`</mark> `https://api-ccmp.bitoftrade.com/sign-event`

#### Request Body

| Name                                      | Type   | Description                   |
| ----------------------------------------- | ------ | ----------------------------- |
| chainId<mark style="color:red;">\*</mark> | Number | Chain id of the event         |
| txHash<mark style="color:red;">\*</mark>  | String | Transaction hash of the event |
| abi<mark style="color:red;">\*</mark>     | Object | ABI of the event              |

{% tabs %}
{% tab title="200: OK " %}

```json
{
  "chainId": 1,
  "txHash": "0xa3b1123b8181f27c30f9cae42340325f0fcecf80c7886045dc159a8b8abd9a63",
  "eventHash": "0x2d734e2f6520ad47f4fbd40ac2f7fa491c029d1b06916be7ba544e2133d16bb5",
  "signature": "0xd189b3df1b889c280f4dc84de5aaaf9aaf425838752ff3ceb13234aae17d12f46375420d93181968ce03d02a5069c2d848a2512113d24004db9001ff889d9fa21c",
  "signer": "0x50fde2a03a1edfd7e1fddeda73d6620a1d0beee3",
  "params": [
    "Transfer",
    1,
    "0xA0b86991c6218b36c1d19D4a2e9Eb0cE3606eB48",
    "0xa3b1123b8181f27c30f9cae42340325f0fcecf80c7886045dc159a8b8abd9a63",
    "0x974CaA59e49682CdA0AD2bbe82983419A2ECC400",
    "0x59169f3c0e9e3630D0EBa5E5561dC1677D9451F3",
    "1574766820"
  ]
}
```

{% endtab %}
{% endtabs %}

`POST /sign-event` the endpoint which is used to get proof of the event.

This endpoint requires a request body with the following type:&#x20;

```json
{
  "chainId": 1,
  "txHash": "0x0615eacbe66c7547142654509c136119c7a6432b6405264901496fa47009e35e",
  "abi": {
    "name": "string",
    "type": "string",
    "anonymous": true,
    "inputs": [
      {
        "name": "string",
        "type": "string",
        "indexed": true
      }
    ]
  },
  "eventLogIndex": 1
}
```

Where:

* `chainId` and `txHash` are from the transaction that has the `event`,&#x20;
* `abi` is the [ABI](https://docs.soliditylang.org/en/develop/abi-spec.html) of the `event`
* `eventLogIndex` *(optional)* - parameter that specifies the log index for the event. By default, the first event-matched ABI  will be selected.

The response body will have the following type:&#x20;

```json
{
  "chainId": 1,
  "txHash": "0xa3b1123b8181f27c30f9cae42340325f0fcecf80c7886045dc159a8b8abd9a63",
  "eventHash": "0x2d734e2f6520ad47f4fbd40ac2f7fa491c029d1b06916be7ba544e2133d16bb5",
  "signature": "0xd189b3df1b889c280f4dc84de5aaaf9aaf425838752ff3ceb13234aae17d12f46375420d93181968ce03d02a5069c2d848a2512113d24004db9001ff889d9fa21c",
  "signer": "0x50fde2a03a1edfd7e1fddeda73d6620a1d0beee3",
  "params": [
    "Transfer",
    1,
    "0xA0b86991c6218b36c1d19D4a2e9Eb0cE3606eB48",
    "0xa3b1123b8181f27c30f9cae42340325f0fcecf80c7886045dc159a8b8abd9a63",
    "0x974CaA59e49682CdA0AD2bbe82983419A2ECC400",
    "0x59169f3c0e9e3630D0EBa5E5561dC1677D9451F3",
    "1574766820"
  ]
}
```

Where:

* `eventHash`  - [hash](/for-developers/cross-chain-messaging-protocol/how-it-works/signer-service/event-hash) of the event
* `signature` - is signed eventHash by the `signer`
* `params` - list of the params, `eventId` and `eventArgs`


# Signers Registry Contract

Signers Registry contract is used by other smart contracts to verify if the signature was created by the whitelisted signer. This smart contract has to be deployed on each supported chain.&#x20;

SignersRegistry implements this interface:

```solidity
interface ISignersRegistry {
    function isPublicWhitelisted(address signer) view external returns (bool);
    function isPrivateWhitelisted(address signerAdmin, address signer) view external returns (bool);
}
```

The signer could be `public` or `private`.&#x20;

* Anyone can use the `public` signer for supported chains.
* The `Private` signer could be used for specific dApps, chains, etc. Such signers are restricted and closed for the community. Contact us if you want to implement a private signer.&#x20;

See the [example](/for-developers/cross-chain-messaging-protocol/quick-start/receive-event) to understand how to use Signers Registry smart contract.

See deployed smart contract on [explorer](https://polygonscan.com/address/0x3E0387bDcCe1b2A416700FC075f8c33c3A5f7E07#readProxyContract).


# Quick start

In our example, we covered these steps:

1. Emit event on the [Mainnet](https://etherscan.io/tx/0x9f89aae86d1b69cf63065bfc9f30478b6dc613b4655a857bc115a1275604b88c) chain&#x20;
2. Get proof of the event from the Signer
3. Receive event on the [Polygon](https://polygonscan.com/tx/0x3b9c04a4d3d0061173be7654724a9114441f125bc5912a4b31e9bb3f39b4223c) chain

See [How it works](/for-developers/cross-chain-messaging-protocol/how-it-works) page to better understand protocol flow.&#x20;


# Emit event

Cross Chain Messaging Protocol makes it possible to send events between different chains. CCMP relies on the events. To start interacting with it, modify your **Src** smart contract to emit the event.

```solidity
pragma solidity ^0.8.0;

contract MsgSender {
    event MyMessage(string message);

    function sendMessage(string memory _message) external {
        emit MyMessage(_message);
    }
}
```

You could also add **destChainId** and **destAddress** params to the event to make it more specific. However, none of those are required, and you could pass any parameters depending on your internal dApp logic.&#x20;

See the example of `sendMessage` transaction on the [explorer](https://etherscan.io/address/0x1170490264e8c604e0d0861b76768a9e9a300b02).


# Verify event

After the event was emitted, the next step is to receive proof of the event. Signer is responsible to create a signature as proof of the event.&#x20;

Create `POST /sign-event` [request](/for-developers/cross-chain-messaging-protocol/how-it-works/signer-service/signer-interface) to the Signer.&#x20;

For our example, the request body would be:

```json
{
  "chainId": 1,
  "txHash": "0x9f89aae86d1b69cf63065bfc9f30478b6dc613b4655a857bc115a1275604b88c",
  "abi": {
    "anonymous": false,
    "inputs": [
        {
            "indexed": false,
            "name": "message",
            "type": "string"
        }
    ],
    "name": "MyMessage",
    "type": "event"
  }
}
```

As a result of the request, we receive the following object:

<pre class="language-json"><code class="lang-json"><strong>{
</strong>  "chainId": 1,
  "txHash": "0x9f89aae86d1b69cf63065bfc9f30478b6dc613b4655a857bc115a1275604b88c",
  "eventHash": "0x32b5aaa307499c5f926182bcb425d152e9d17e0c38ad46aecfc8b3007005221d",
  "signature": "0xc7067dbae67fe37d68945b4d32d636c02590d4e0da3dcd87616356178afc3d6b048ea054954bce2e5d2d853e379bc4f8fc16f6c0cb68de50cee844407806e09a1b",
  "signer": "0x86f3b7f305f9d02e243a28445a15ecb6eeb12288",
  "params": [
    "MyMessage",
    1,
    "0x1170490264E8c604E0D0861B76768A9e9a300b02",
    "0x9f89aae86d1b69cf63065bfc9f30478b6dc613b4655a857bc115a1275604b88c",
    "Hello World"
  ]
}
</code></pre>

The signature is created, therefore we can move to the last step.


# Receive event

After the event was made on the SRC chain and verified by the Signer, the last step of the protocol is receiving that event on the **DEST** chain.&#x20;

\
We can trust that event happened on the **SRC** chain if proof of this event was made by the correct signer. [Signers Registry smart contract](/for-developers/cross-chain-messaging-protocol/how-it-works/signers-registry-contract) is responsible for this validation.

In our example, to receive the event on the **DEST** chain, we have to call `receiveMyMessage` method on the `MsgReceiver`.&#x20;

```solidity
pragma solidity ^0.8.0;

contract MsgReceiver {
    event MyMessageReceived(string message);

    ISignersRegistry signersRegistry;

    constructor(address _signersRegistry) {
        signersRegistry = ISignersRegistry(_signersRegistry);
    }

    function receiveMyMessage(
        bytes calldata _signature,
        string memory _message,
        address _msgSender,
        uint256 _chainId,
        bytes calldata _transactionHash
    ) external {
        bytes32 eventHash = keccak256(abi.encodePacked("MyMessage", _chainId, _msgSender, _transactionHash, _message));
        address signer = eventHash.recover(_signature);
        bool isSignerWhitelisted = signersRegistry.isPublicWhitelisted(signer);
        
        require(isSignerWhitelisted, "Signer is not whitelisted");

        emit MyMessageReceived(_message);
    }
}

```

You can check, that [eventHash](/for-developers/cross-chain-messaging-protocol/how-it-works/signer-service/event-hash) was made the same way as Signer did while making the signature. It's very important to recover the signature with the same eventHash.&#x20;

After the signature maker was recovered, `signersRegistry` checked if the signer was whitelisted. That's why all public and private `Signers` have to be whitelisted before producing any event proofs.

If `signersRegistry` approved that the signer was whitelisted, it means that we can trust this event. Therefore, do any steps required by your dApp.&#x20;

In our example, it just emits the `MyMessageReceived` event.&#x20;

See the example of the `receiveMyMessage` transaction on the [explorer](https://polygonscan.com/tx/0x3b9c04a4d3d0061173be7654724a9114441f125bc5912a4b31e9bb3f39b4223c).


# Smart contracts

Signers Registry&#x20;

<table><thead><tr><th width="184">Chain</th><th>Address</th></tr></thead><tbody><tr><td>Mainnet</td><td><a href="https://etherscan.io/address/0x50dbb856b8f69486fc7e652d101d32b4820a7cb0">0x50dbb856b8f69486fc7e652d101d32b4820a7cb0</a></td></tr><tr><td>Polygon</td><td><a href="https://polygonscan.com/address/0x50dbb856b8f69486fc7e652d101d32b4820a7cb0">0x50dbb856b8f69486fc7e652d101d32b4820a7cb0</a></td></tr><tr><td>BSC</td><td><a href="https://bscscan.com/address/0x50dbb856b8f69486fc7e652d101d32b4820a7cb0">0x50dbb856b8f69486fc7e652d101d32b4820a7cb0</a></td></tr><tr><td>Avalanche</td><td><a href="https://snowtrace.io/address/0x50dbb856b8f69486fc7e652d101d32b4820a7cb0">0x50dbb856b8f69486fc7e652d101d32b4820a7cb0</a></td></tr><tr><td>Fantom</td><td><a href="https://ftmscan.com/address/0x50dbb856b8f69486fc7e652d101d32b4820a7cb0">0x50dbb856b8f69486fc7e652d101d32b4820a7cb0</a></td></tr><tr><td>Arbitrum</td><td><a href="https://arbiscan.io/address/0x50dbb856b8f69486fc7e652d101d32b4820a7cb0">0x50dbb856b8f69486fc7e652d101d32b4820a7cb0</a></td></tr><tr><td>Optimism</td><td><a href="https://optimistic.etherscan.io/address/0x50dbb856b8f69486fc7e652d101d32b4820a7cb0">0x50dbb856b8f69486fc7e652d101d32b4820a7cb0</a></td></tr></tbody></table>


# Advanced

If you are familiar with CCMP protocol you can dive deeper to better understand how the Signer Service works under the hood.&#x20;

Consider the [Threshold Signature](/for-developers/cross-chain-messaging-protocol/advanced/threshold-signature) section to become familiar with the TSS protocol, which is used by our [Signer Service](/for-developers/cross-chain-messaging-protocol/how-it-works/signer-service).

Also, take a look at the [Hosted TSS Signer](/for-developers/cross-chain-messaging-protocol/advanced/hosted-tss-signer) section to know how and why Hosted TSS Signer can be used for your dApp to make it even more secure.&#x20;


# Threshold Signature

The threshold signature (TSS) protocol is a cryptographic scheme that allows a group of participants to collectively sign a message or transaction without revealing their private keys to each other.&#x20;

In a threshold signature scheme, the private key is split into several shares, each of which is distributed among the group of participants. To generate a signature, a minimum threshold of participants is required to combine their shares and produce a partial signature.&#x20;

Threshold signature protocols are considered secure because they provide several security guarantees that protect against various types of attacks, such as the compromise of a single participant's private key or the collusion of a group of participants.

Our own [Signer Service](/for-developers/cross-chain-messaging-protocol/how-it-works/signer-service) relies on the TSS protocol. This distributed trust model makes it difficult for any one participant or third-party service to compromise the system. Therefore, the Signer Service is reliable and trusted by our clients.&#x20;


# Hosted TSS signer

As you know from the previous section, the TSS protocol can be used for the Signer Service to make it even more secure and trusted. Despite the fact that we rely on our Signer Service with TSS protocol run under the hood, we deeply understand your desire to be responsible and host your own independent TSS.

Here are some benefits of hosting TSS:

* Easily decide amounts of parties and threshold.&#x20;
* Configure it to your own dApp.
* It's trusted because you control all parties by yourself.

Private Signer Services are still compatible with our [Signers Registry](/for-developers/cross-chain-messaging-protocol/how-it-works/signers-registry-contract), so you don't need to worry about deploying anything else.

As an additional service, we provide full documentation and support to help you setup up your TSS. Please [Contact Us](/contact-us) to get additional instructions.


# Security

CCMP protocol consists of two components:

* Signers Registry smart contract
* Signer Service

Our smart contracts are audited and well-secured. Also, we use [Gnosis Safe](https://safe.global/) as another layer of security to manage all our smart contracts. It helps us make it more trustable and open for the community.&#x20;

Our Signer Service is secured by [TSS Protocol,](broken://pages/K857grhlYgij53B1IplN) making it almost impossible to compromise our signer.&#x20;

You have the option to deploy your [own TSS Signer](broken://pages/xENZ1kqrFf84gfQVpOh0) and configure it to the needs of your dApp.

As a result of approaches, the Cross-Chain Messaging Protocol is secured and trusted.&#x20;


# FAQ

<details>

<summary>Is the service free? </summary>

Yes, it's completely free and public. You can use it right now for your cross-chain applications.

</details>

<details>

<summary>Is it secure? </summary>

Yes, it is. Our Signer Service uses TSS protocol under the hood to make it almost impossible to compromise our signer.

</details>

<details>

<summary>Why does it exists?</summary>

There are a lot of different blockchains and networks. Users need to exchange tokens, NFT, and transfer liquidity. CCMP makes it easy to interact between chains.&#x20;

</details>

<details>

<summary>How we are different from other solutions? </summary>

We are much more friendly than ChainLink or Multichain. You can use our service without any requirements, you don't need to be whitelisted, etc. \
Also, we are free and open to the community.&#x20;

</details>


# General


# How to download and connect MetaMask for desktop?

### Follow our step-by-step process download and start using MetaMask.

Setting up MetaMask on your desktop browser couldn’t be easier!

With our six simple steps you’ll be connected to MetaMask in no time:

If you haven't installed it yet, go to [Metamask.io](https://metamask.io/) and download the wallet extension on your browser.

You can either open a new wallet or restore an old one using your secret seed phrase. To create a new wallet you’ll need to set a password.

![Screen\_Shot\_2022-06-13\_at\_13.15.22.png](https://bitoftrade.zendesk.com/hc/article_attachments/6843802680465/Screen_Shot_2022-06-13_at_13.15.22.png)

![Screen\_Shot\_2022-06-13\_at\_13.16.01.png](https://bitoftrade.zendesk.com/hc/article_attachments/6843802831249/Screen_Shot_2022-06-13_at_13.16.01.png)

Get your secret recovery phrase of 12 seed words. Make sure you keep it in a safe place and never share it with anyone. This is the key to your funds.

![Screen\_Shot\_2022-06-13\_at\_13.16.16.png](https://bitoftrade.zendesk.com/hc/article_attachments/6843802861201/Screen_Shot_2022-06-13_at_13.16.16.png)

Confirm your seed phrase by entering it in the right order.

![Screen\_Shot\_2022-06-13\_at\_13.17.40.png](https://bitoftrade.zendesk.com/hc/article_attachments/6843818586513/Screen_Shot_2022-06-13_at_13.17.40.png)

You’re all set! To get started, simply go to [bitoftrade.com](https://bitoftrade.com/) and select “Start Trading”.

Click “Connect MetaMask” and approve the connection. If you have multiple accounts on your MetaMask, please make sure you choose the one you'd like to start trading with.

You’re now ready to start trading with bitoftrade! For more information about MetaMask read our article [MetaMask Review: A Complete Guide Of The Best Ethereum Wallet](https://bitoftrade.com/blog/metamask-review-a-complete-guide-of-the-best-ethereum-wallet-by-bitoftrade) over on our blog.


# How do I download and connect MetaMask for mobile?

### Step-by-step process of downloading MetaMask.

MetaMask is the most popular Ethereum wallet out there, before you can use the bitoftrade platform you’ll need to have a MetaMask wallet. Connecting to your MetaMask wallet has never been easier!&#x20;

You can download MetaMask with these simple steps or watch this [video tutorial](https://www.youtube.com/watch?v=xAWdJTzvhV4):

* If you haven't installed MetaMask yet, go to the [App Store](https://www.apple.com/uk/app-store/) or [Google Play](https://play.google.com/) and download the wallet app on your mobile.
* You can either open a new wallet or restore an old one using your secret seed phrase.&#x20;
* Open the MetaMask app and click “Get started”, then click “Create a new wallet”, don’t forget to read and agree to the terms and conditions.

![IMG\_2030.jpg](https://bitoftrade.zendesk.com/hc/article_attachments/6843899758353/IMG_2030.jpg)

* The next step is to create a strong password and secure the wallet by setting up a secret recovery phrase of 12 seed words, and then your wallet is ready!

&#x20;

![IMG\_2033.jpg](https://bitoftrade.zendesk.com/hc/article_attachments/6843915908369/IMG_2033.jpg)

![IMG\_2035.jpg](https://bitoftrade.zendesk.com/hc/article_attachments/6843900581905/IMG_2035.jpg)

![IMG\_2036.jpg](https://bitoftrade.zendesk.com/hc/article_attachments/6843900687761/IMG_2036.jpg)

![IMG\_2037.jpg](https://bitoftrade.zendesk.com/hc/article_attachments/6843900855057/IMG_2037.jpg)

* Connect MetaMask and bitoftrade with these three handy steps:&#x20;
* Go onto our [website](https://bitoftrade.com/) here and click “Start Trading”.
* Once your wallet is all set up, click “Connect MetaMask” and the app will automatically open, or you can scan the QR code prompted on the platform from the MetaMask app.&#x20;
* Approve the connection. If you have multiple accounts on your MetaMask, please make sure you choose the one you'd like to start trading with.

You’re now ready to start trading with bitoftrade! For more information about MetaMask read our article [MetaMask Review: A Complete Guide Of The Best Ethereum Wallet](https://bitoftrade.com/blog/metamask-review-a-complete-guide-of-the-best-ethereum-wallet-by-bitoftrade) over on our blog.


# How do I import ERC20 tokens to MetaMask?

#### A step-by-step guide to adding ERC20 tokens to your MetaMask wallet.

This process can be used to import Ethereum, Polygon, Avalanche, Fantom, and Binance Smart Chain (BSC) tokens to your MetaMask wallet.

Sometimes tokens don’t show up in your [MetaMask](https://metamask.io/) wallet but don’t worry, all you need to do is add them!&#x20;

Firstly, open your MetaMask wallet and click “**Import Tokens**”:

![IMG\_2025.jpg](https://bitoftrade.zendesk.com/hc/article_attachments/6844205180945/IMG_2025.jpg)

Type the token in the “**Search**” bar in the MetaMask wallet:

![IMG\_2026.jpg](https://bitoftrade.zendesk.com/hc/article_attachments/6844205180433/IMG_2026.jpg)

**Another way is...**

The best and safest way to add your token is to click on the transaction hash that takes you to the block explorer.

You then need to find the last contract, the one that matches your transaction and click on it.

![Screen\_Shot\_2022-06-13\_at\_13.55.36.png](https://bitoftrade.zendesk.com/hc/article_attachments/6844205653009/Screen_Shot_2022-06-13_at_13.55.36.png)

![Screen\_Shot\_2022-06-13\_at\_13.56.24.png](https://bitoftrade.zendesk.com/hc/article_attachments/6844205875345/Screen_Shot_2022-06-13_at_13.56.24.png)

You’ll be redirected to your token contract. Copy the address:

![IMG\_2028.jpg](https://bitoftrade.zendesk.com/hc/article_attachments/6844236932881/IMG_2028.jpg)

Go back to MetaMask and click “Import Token”. Choose the “Custom Token” tab and paste the address.

![IMG\_2029.jpg](https://bitoftrade.zendesk.com/hc/article_attachments/6844237111313/IMG_2029.jpg)

Finally, select “Import” and you’re all done!

You’re now all set to start using ERC20 tokens on the [bitoftrade](https://bitoftrade.com/) platform!


# How do I manage my funds in a volatile market?

#### How to best predict the crypto market and protect your funds.

Staying afloat in the volatile crypto world is largely dependent on your overall understanding of the market. Yes, it can be hard to predict but it’s not impossible! To make accurate market behavior predictions, you need a firm understanding of both fundamental and technical analysis, as well as keeping an eye out for key market indicators and any strategies you can implement. Of course, there are always [bullish patterns](https://bitoftrade.com/blog/top-5-bullish-patterns-for-crypto-trading) and [crypto candles](https://bitoftrade.com/blog/how-to-read-crypto-charts-a-guide-to-crypto-candles) too!

&#x20;

**Fundamental analysis.** This analysis includes researching as much as you can about the project, financial, and on-chain metrics.

Fundamental analysis is best used to determine a token’s intrinsic value. Once you’ve investigated a token’s background and its creators, you can begin to understand whether the coin represents good market value. For example, is this an industry-changing project? Or, does the analysis suggest a quick decline? By applying these methods and gaining sufficient knowledge, you can make an informed decision.

&#x20;

**Technical analysis.** This is based on charts that factor in price changes, order sizes, and turnover values.

Technical analysis involves observing the market historically and keeping your eyes peeled for any trends. You can look at trading volumes and any shifts in price! This method is the most efficient way to study how profitable a token may or may not prove to be. By following price variations and patterns, the theory behind technical analysis can be applied to assume both long and short-term price variations.

&#x20;

**Indicators:** Market indicators can, mostly, be grouped into four specific categories: Momentum, Volume, Trend, and Volatility.

&#x20;

Momentum indicators, such as the Stochastic Oscillator, compare the most recent closing price of an asset against any maximum price variations (high and low) during a defined period.

&#x20;

Volume indicators (known as on-balance volume or OBV), meanwhile, use technical analysis to predict any obvious changes in an asset’s stock price.

&#x20;

Trend: Moving averages, such as Simple Moving Averages (SMA) and Exponential Moving Averages (EMA), track, quite simply, the average movement of an asset’s price across a specified time frame.

&#x20;

Volatility: Bollinger bands (or Boll Indicator), Standard deviation and ATR are three examples of volatility indicators. Volatility indicators are best used to detect potential fluctuations in the market, by highlighting whether or not an asset is being overbought or oversold.

For more information about our crypto indicators, please click [here](https://bitoftrade.com/blog/best-indicators-for-day-trading-crypto)**.**

&#x20;

**Strategies:** There are four main strategy methods that you can apply when trading: position trading, scalp trading, swing trading, and day trading. Figuring out which works best for you is a simple case of trial and error. Always pick the strategy that suits you best!

&#x20;

A **position trade** is close to a buy-and-hold investment strategy. The idea is to capitalize on trends in the crypto market by identifying strong tokens and holding onto them until the time is right to trade, so when you notice a price rise.

&#x20;

**Scalping trading** is extremely fast-paced. A crypto scalper can make up to 20 trades in a few minutes, though it takes a lot of energy to do so. As crypto prices can change rapidly, a scalper has to watch for increases in trading volumes and know the exact exit point before even beginning the trade. The key to successful scalp trading is using a trading platform with fast execution times so you avoid lag time.

&#x20;

**Swing trades** are somewhat the opposite of scalp trades, as the time frame of a swing trade is usually longer. The idea around swing positions is to spy any ‘swings’ in the crypto market— these can occur over days, weeks, and even months!&#x20;

&#x20;

**Day trading** involves opening and closing asset positions on the same day and is viewed as short-term crypto trading. With day trading, your goal is to increase profits as the price of a token moves - though you should always consult technical indicators to suss out potential entry and exit points.&#x20;

\
You can read more about managing a volatile market in our article [Crypto Prediction Guide: Understand The Market and Predict Future Behavior](https://bitoftrade.com/blog/crypto-prediction-guide-understand-the-market-and-predict-future-behavior).


# How to invest in cryptocurrency

#### Helpful tips for investing in crypto

Are you looking to invest in cryptocurrency? Well, you’ve come to the right place. With our helpful tips, you can start trading crypto in no time!

We’ve compiled a list of helpful tips for you to consider before you start investing:

**Market research.** You should research all of the tokens you’re planning on investing in, and learn as much about their history and market value as you can. You should also look into the type of trading platform you’d like to use, we have a helpful article about [CEXs vs DEXs](https://bitoftrade.com/blog/dex-vs-cex-know-where-to-trade) to guide your research.

&#x20;

**Assess risk.** Trading crypto is exciting and it can be easy to get carried away, so we recommend only investing in what you’re willing to lose. Assess the financial risk before executing any trade as this ensures you don’t make losses you can’t afford.

&#x20;

**Using a crypto wallet.** Before you can start trading like a pro, you’ll need a crypto wallet! Think of a crypto wallet as similar to a virtual wallet, except it stores the public and private keys for cryptocurrency transactions. The most popular Ethereum wallet is MetaMask. Check out our handy video on installing below. You can also use your Trust Wallet on our platform.

&#x20;

**Diversify your portfolio.** Holding more than one token reduces the risk of losing all of your assets. If you invest everything in one token, and it sees a huge value drop in the market, you risk losing everything. This is why we offer all tokens over multiple networks on our platform—so you’ll have plenty to choose from!

{% embed url="<https://www.youtube.com/watch?v=xAWdJTzvhV4>" %}

&#x20;

For more tips on investing, read our educational articles about crypto:

* [How to Trade Crypto Responsibly: Tips for Beginners](https://bitoftrade.com/blog/how-to-trade-crypto-responsibly-tips-for-beginners)
* [How to Make Money with Cryptocurrency and Increase Your Profits?](https://bitoftrade.com/blog/how-to-make-money-with-cryptocurrency-and-increase-your-profits)
* [Best Day Trading Crypto Strategies 2022: Ultimate Guide](https://bitoftrade.com/blog/best-day-trading-crypto-strategies-2022-ultimate-guide)
* [How to Earn Crypto Passive Income](https://bitoftrade.com/blog/how-to-earn-crypto-passive-income)


# Polygon


# How to swap on the Polygon network

#### A step-by-step guide on how to swap tokens on the Polygon network with bitoftrade.

Swapping tokens on bitoftrade using the Polygon network is easy. In fact, swapping on Ethereum follows the same process. Just make sure you’ve changed the network setting in the drop-down menu of the trading dashboard!

Start swapping tokens on the Polygon network in eight simple steps:

1. Start by going to our [trading dashboard](https://bitoftrade.com/trading/swap/USDC/MATIC) by clicking on “Start Trading”.
2. Connect your MetaMask or Trust Wallet and choose the “Swap” option on the trading dashboard. Remember to select “Polygon” from the “Network” dropdown menu.
3. Set your trading pair by searching for a specific token and choosing how many tokens you want to trade.
4. Click “Confirm”. You’ll see your transaction summary, including all estimated fees. If this is the first time you swap a certain token, you’ll need to unlock it.
5. Accept the terms. Your wallet will open automatically.
6. After approving the transaction on your wallet, a progress bar will appear on the widget and will disappear after approval.
7. When the transaction is finished, you can see its status in the “Transaction History” section at the bottom of the page, as well as the new tokens in your wallet.
8. Once done, go to [Polygonscan](https://polygonscan.com/) to see your transaction details on the Ethereum blockchain.

You’re now ready to start swapping tokens on the Polygon network! If you need further guidance we recommend watching our video tutorial below

{% embed url="<https://www.youtube.com/watch?v=Vwdua-eAhVo>" %}


# How to bridge my Polygon tokens

#### Our step-by-step guide for bridging with Polygon.

Some networks require a bridge to transfer tokens from one network to another, and Polygon is one of them! All you need is the [Polygon Bridge](https://wallet.polygon.technology/bridge/), to transfer ERC tokens to the Polygon side-chain using smart contracts. This may sound a little complicated, but it really isn’t!

&#x20;

You can learn how to use the Polygon Bridge in our simple step-by-step guide below:

1. Visit the Polygon Bridge [website](https://wallet.polygon.technology/bridge/) and connect your wallet to the polygon PoS bridge platform.
2. Click the “Deposit” option and choose the network you want to convert tokens from, the token, and the amount.
3. Click on the “Transfer” button. Next, you’ll see a pop-up window with all gas fees related to this operation.&#x20;
4. Press “Continue” and confirm the transaction on your wallet.
5. The transaction request will be sent to the network. This might take a few minutes.&#x20;

You’ll then be able to see the tokens in your wallet!&#x20;

\
**Important note**: The Proof of Stake (PoS) bridge is secured by validators and usually takes from 45 minutes to three hours when/if you want to move your funds back to Ethereum.


# How to add Polygon to my MetaMask

#### Find out how to add Polygon to your MetaMask with our step-by-step guide.

Polygon is one of five integrated networks that you use to trade with on the bitoftrade platform! Before you can start using Polygon to trade like a pro, you’ll need to connect the Polygon network to your MetaMask wallet. Don’t worry if you don’t know how, we’ve got you covered!

&#x20;

You can add Polygon to your MetaMask in four simple steps:

First Open MetaMask and click the network dropdown menu. Next, select “Add Network”.![Screen\_Shot\_2022-06-13\_at\_18.00.36.png](https://bitoftrade.zendesk.com/hc/article_attachments/6845448190993/Screen_Shot_2022-06-13_at_18.00.36.png)

![Screen\_Shot\_2022-06-13\_at\_18.01.16.png](https://bitoftrade.zendesk.com/hc/article_attachments/6845448198289/Screen_Shot_2022-06-13_at_18.01.16.png)

&#x20;

Add the following information to the “Adding Network” form and save:

* Network Name - Polygon
* New RPC URL: [https://polygon-rpc.com](https://polygon-rpc.com/)
* Chain ID - 137
* Currency Symbol - MATIC
* Block Explorer URL: <https://polygonscan.com/>

Click “Save” when you’re finished. You’ll now successfully be connected to the Polygon network.

![Screen\_Shot\_2022-06-13\_at\_18.02.46.png](https://bitoftrade.zendesk.com/hc/article_attachments/6845399968913/Screen_Shot_2022-06-13_at_18.02.46.png)

\
You can also check our video tutorial to learn how to add the Polygon network to your MetaMask here:

{% embed url="<https://www.youtube.com/watch?v=5suiZvOYaCI>" %}


# Binance Smart Chain


# How to bridge my BSC tokens

#### Our step-by-step for bridging BSC.

Some networks require a bridge to transfer tokens from one network to another, BSC is one of them! All you need is [AnySwap](https://bsc.anyswap.exchange/bridge#/router), a complex cross-chain solution that allows you to transfer tokens from one network to another using a bridge. AnySwap can also execute decentralized swaps between networks. This may sound a little complicated, but it really isn’t!

&#x20;

You can learn how to use AnySwap in our simple step-by-step guide below:

1. Start by going to [AnySwap](https://bsc.anyswap.exchange/bridge#/router) and connecting your MetaMask or Trust Wallet.&#x20;
2. Select the token and networks that you’d like to bridge with. Make sure you are selecting the correct From and To networks, e.g. from BSC mainnet to ETH mainnet, or vice versa.
3. You then need to read the fees. When ready, click “Acknowledge Fees”. Make sure you understand the fees and terms discussed before you click the “Swap” button.&#x20;
4. Proceed to Swap, and wait for the tokens to show up on the network you sent them to.&#x20;

&#x20;

**Important note:** Don't worry if you feel like you're waiting too long. The process of transferring funds from one network to another can approximately take between 10 minutes and 24 hours, depending on the traffic. You can look up transactions and check their progress here: [https://bscscan.com](https://bscscan.com/).

&#x20;

You’re now ready to start using your new BSC tokens on our platform!


# How to swap on the BSC network

#### Learn more about swapping tokens on the BSC network with bitoftrade.&#x20;

Swapping tokens on our platform is straightforward, and with our simple tutorial, you’ll be swapping tokens on the BSC network like an expert!

&#x20;

Start swapping tokens with our eight handy steps:

1. Go to the trading dashboard on our [website](https://bitoftrade.com/) by clicking on “Start Trading”.
2. Connect your Ethereum wallet and choose “Swap” on the trading dashboard. Make sure you’re trading on the BSC network before executing the trade.
3. Set your trading pair by searching for a specific token by name and choosing how many tokens you want to trade.
4. Click ‘Confirm’ and you’ll see your transaction summary, including all estimated fees.
5. Accept the terms and your MetaMask wallet will open automatically.
6. After approving the transaction on your wallet, a progress bar will appear on the widget and it’ll disappear after approval.
7. When the transaction is finished, you can see its status in the “Transaction History” section at the bottom of the page, as well as the new tokens in your wallet.
8. Once finished, go to your BSC’s blockchain explorer [BscScan](https://bscscan.com/) and see your transaction details.

\ <br>

Additionally, you can watch our short tutorial on how to swap tokens on bitoftrade:

{% embed url="<https://www.youtube.com/watch?v=Vwdua-eAhVo>" %}

\
**Important note:** Make sure you’re on the right network before you execute a trade. You can check this by selecting the BSC network from the drop-down menu on our trading dashboard:


# How to add BSC to my MetaMask

#### Find out how to add BSC to your MetaMask with our step-by-step guide.

BSC is one of five integrated networks that you use to trade with on the bitoftrade platform! Before you can start using BSC, you’ll need to connect the BSC network to your MetaMask wallet. Don’t worry if you don’t know how, we’ve got you covered!

To add BSC to your wallet, you need to add its network details to the MetaMask extension. You can do this with our handy four-step guide:

Open MetaMask and click on the network dropdown menu.

![Screen\_Shot\_2022-06-13\_at\_18.00.36.png](https://bitoftrade.zendesk.com/hc/article_attachments/6845443715345/Screen_Shot_2022-06-13_at_18.00.36.png)

Click on the “Add Network” button.

![Screen\_Shot\_2022-06-13\_at\_18.01.16.png](https://bitoftrade.zendesk.com/hc/article_attachments/6845492260497/Screen_Shot_2022-06-13_at_18.01.16.png)

&#x20;Add the following information to the “Adding Network” form:

* Network Name: Smart Chain
* New RPC URL: <https://bsc-dataseed.binance.org/>
* Chain ID: 56
* Symbol: BNB
* Block Explorer URL: [https://bscscan.com](https://bscscan.com/)

Click the “Save” button when you’re finished.

![Screen\_Shot\_2022-06-13\_at\_18.06.33.png](https://bitoftrade.zendesk.com/hc/article_attachments/6845443842449/Screen_Shot_2022-06-13_at_18.06.33.png)

Your MetaMask will now successfully be connected to the Binance Smart Chain network!


# Fantom


# How to bridge my Fantom tokens

#### Step-by-step instruction on how to bridge Fantom tokens.

Some networks require a bridge to transfer tokens from one network to another, and Fantom is one of them! All you need is the [Multichain](https://multichain.xyz/) bridge, to transfer assets between Ethereum, Fantom, and other networks.&#x20;

You can learn how to use Multichain in our simple step-by-step guide below:

1. Go to the [Multichain](https://multichain.xyz/) website and then log in to your MetaMask or Trust Wallet. Select the network you want to transfer from, and the account with the assets you would like to bridge cross-chain.
2. On the Multichain app or website, click “Connect to a Wallet” and select “MetaMask” or “Trust Wallet”.
3. Select the account you would like to connect to, click “Next”, followed by “Confirm”. Lastly, click “Connect”.
4. Make the appropriate selections in the From and To sections of the Multichain page, indicating the networks and tokens you are bridging.
5. Next, specify the number of tokens to bridge.&#x20;
6. Click “Swap", then confirm the transaction in Multichain. A window will open, asking you to approve the transaction. Click the “Confirm” button. Your tokens will be bridged within a couple of minutes.

**Important note:** Multichain does not charge a fee to bridge ERC20-Opera FTM.

And there you have it: a successful cross-chain transfer!


# How to swap on the Fantom network

#### Learn more about swapping tokens on the Fantom network with bitoftrade.&#x20;

Swapping tokens on our platform is straightforward, and with our simple step-by-step guide, you’ll be swapping tokens on the Fantom network like a pro!

Start swapping tokens with our eight handy steps:

1. Go to the trading dashboard on our [website](https://bitoftrade.com/) by clicking on “Start Trading”.
2. Connect your Ethereum wallet and choose “Swap” on the trading dashboard. Make sure you’re using the Fantom network before executing the trade.
3. Set your trading pair by searching for a specific token by name and choosing how many tokens you want to trade.
4. Click ‘Confirm’ and you’ll see your transaction summary, including all estimated fees.
5. Accept the terms and your wallet will open automatically.
6. After approving the transaction on your wallet, a progress bar will appear on the widget and it’ll disappear after approval.
7. When the transaction is finished, you can see its status in the “Transaction History” section at the bottom of the page, as well as the new tokens in your wallet.
8. Once finished, go to Fantom’s blockchain explorer [FTMscan](https://ftmscan.com/) and see your transaction.

Additionally, you can watch our short tutorial on how to swap tokens on bitoftrade:

{% embed url="<https://www.youtube.com/watch?v=Vwdua-eAhVo>" %}

\
**Important note:** Make sure you’re on the right network before you execute a trade. You can check this by selecting the Fantom network from the drop-down menu on our trading dashboard:


# How to add Fantom to my MetaMask

#### Find out how to add Fantom to your MetaMask with our step-by-step guide.

Fantom is one of five integrated networks that you use to trade with on the bitoftrade platform! Before you can start using Fantom to become an expert trader, you’ll need to connect the Fantom network to your MetaMask wallet. Don’t worry if you don’t know how, we’ve got you covered!

&#x20;

To add Fantom to your wallet, you need to add its network details to the MetaMask extension. You can do this with our handy five-step guide:

Open MetaMask and click on the network dropdown menu.

![Screen\_Shot\_2022-06-13\_at\_18.00.36.png](https://bitoftrade.zendesk.com/hc/article_attachments/6845550063505/Screen_Shot_2022-06-13_at_18.00.36.png)

Click on the “Add Network” button.

![Screen\_Shot\_2022-06-13\_at\_18.01.16.png](https://bitoftrade.zendesk.com/hc/article_attachments/6845535015441/Screen_Shot_2022-06-13_at_18.01.16.png)

Enter the following network:

* Network Name: Fantom Opera
* New RPC Url: [https://rpc.ftm.tools](https://rpc.ftm.tools/)
* Chain ID: 250
* Symbol: FTM
* Block Explorer URL:[ https://ftmscan.com/](https://ftmscan.com/)

![Screen\_Shot\_2022-06-13\_at\_18.09.08.png](https://bitoftrade.zendesk.com/hc/article_attachments/6845550185233/Screen_Shot_2022-06-13_at_18.09.08.png)


# Avalanche


# How to bridge my Avalanche tokens

#### Our step-by-step for bridging Avalanche.

Some networks require a bridge to transfer tokens from one network to another, and Avalanche is one of them! All you need is the [Avalanche Bridge](https://bridge.avax.network/login), to transfer ERC-20 tokens from Ethereum to Avalanche’s C-Chain and vice versa. This may sound a little complicated, but it isn’t! It’s important to know that the bridge doesn’t support native ETH or BTC, so you’ll have to transfer wrapped versions of these tokens (WETH and WBTC) instead.

&#x20;

**Important note:** the Avalanche Bridge only allows transfers to the same address on the other network.&#x20;

You can learn how to bridge Avalanche tokens with our simple step-by-step guide below:

1. Connect your wallet using MetaMask or Trust Wallet and log in.
2. Once you have successfully connected your wallet, ensure that the “From” tab shows Ethereum, otherwise press the “Switch” button and click “Switch Network” when your wallet application prompts.
3. Select the assets and enter the amount you would like to bridge across.
4. Click “Transfer” and sign the transaction prompt that pops up on your wallet.
5. Please wait for the transaction to be completed on both Ethereum and Avalanche networks. It takes approximately 10 minutes on the Ethereum side and 30 seconds on the Avalanche side.
6. Once completed, you have successfully bridged your ERC-20 tokens to Avalanche!

When moving assets from Avalanche to Ethereum, the bridge fee is largely based on the estimated Ethereum transaction fee. This is calculated using current asset prices, the current Ethereum gas price, and the approximate amount of gas that will be used by the Ethereum transaction. As such, the Ethereum transaction fee and bridge fee can be highly variable.


# How to swap on the Avalanche network

#### Learn how to swap trading on the Avalanche network with bitoftrade.&#x20;

Swapping tokens on our platform is straightforward, and with our simple tutorial, you’ll be swapping tokens on the Avalanche network like a pro!

&#x20;

Start swapping tokens with our eight handy steps:

1. Go to the trading dashboard on our [website](https://bitoftrade.com/) by clicking on “Start Trading”.
2. Connect your Ethereum wallet and choose “Swap” on the trading dashboard, make sure you’ve clicked on the Avalanche network.
3. Set your trading pair by searching for a specific token by name and choosing how many tokens you want to trade.
4. Click ‘Confirm’ and you’ll see your transaction summary, including all estimated fees.
5. Accept the terms and your MetaMask or Trust Wallet will open automatically.
6. After approving the transaction on your wallet, a progress bar will appear on the widget and it’ll disappear after approval.
7. When the transaction is finished, you can see its status in the “Transaction History” section at the bottom of the page, as well as the new tokens in your wallet.
8. Once finished, go to your Avalanche’s blockchain explorer [SnowTrace](https://snowtrace.io/) and see your transaction details.

You can also watch our short tutorial on how to swap tokens on bitoftrade:

{% embed url="<https://www.youtube.com/watch?v=Vwdua-eAhVo>" %}

\
**Important note:** Make sure you’re on the right network before you execute a trade. You can check this by selecting the Avalanche network from the drop-down menu on our trading dashboard.


# How to add Avalanche to my MetaMask

#### Find out how to add Avalanche to your MetaMask with our step-by-step guide.

Avalanche is one of five integrated networks that you use to trade with on the bitoftrade platform. Before you can start using Avalanche to trade like a pro, you’ll need to connect the Avalanche network to your MetaMask wallet. Don’t worry if you don’t know how, we’ve got you covered!

&#x20;

To add Avalanche to your wallet, you need to add its network details to the MetaMask extension. You can do this with our handy four-step guide:

Open your wallet extension and click the network dropdown menu.

![Screen\_Shot\_2022-06-13\_at\_18.00.36.png](https://bitoftrade.zendesk.com/hc/article_attachments/6845633439249/Screen_Shot_2022-06-13_at_18.00.36.png)

Click “Add Network”, and you’ll be redirected to the “Add a Network” page.

![Screen\_Shot\_2022-06-13\_at\_18.01.16.png](https://bitoftrade.zendesk.com/hc/article_attachments/6845633453841/Screen_Shot_2022-06-13_at_18.01.16.png)

Copy and paste the following details:

* Network Name: Avalanche Network
* New RPC URL: <https://api.avax.network/ext/bc/C/rpc>
* Chain ID: 43114
* Currency Symbol: AVAX
* Block Explorer URL: <https://snowtrace.io/>

Click the “Save” button. Your MetaMask wallet will be connected to the Avalanche network.

![Screen\_Shot\_2022-06-13\_at\_18.08.01.png](https://bitoftrade.zendesk.com/hc/article_attachments/6845633582225/Screen_Shot_2022-06-13_at_18.08.01.png)

Now you’ve added the Avalanche network to your MetaMask wallet, you can now trade using the Avalanche network on bitoftrade!